
Introduction to Banana Pudding Cheesecake Cones Recipe
Are you ready to indulge in a delightful dessert that combines two beloved treats? The Banana Pudding Cheesecake Cones Recipe is a fun and creamy treat that will surely impress your family and friends. This recipe takes the classic flavors of banana pudding and cheesecake, merging them into a convenient and delicious cone. Perfect for parties, picnics, or just a sweet snack at home, these cones are as easy to make as they are to enjoy!
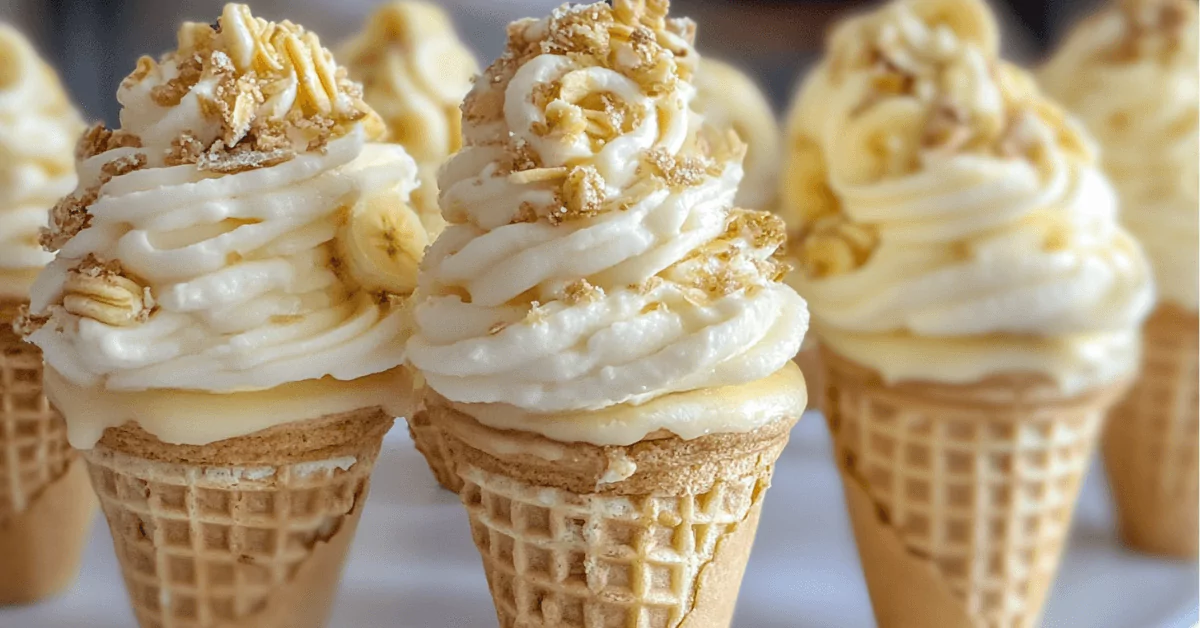
What Makes Banana Pudding Cheesecake Cones Unique?
What sets these cones apart is their unique combination of textures and flavors. The creamy cheesecake filling pairs beautifully with the rich banana pudding, creating a luscious experience in every bite. The crunchy waffle cone adds a delightful contrast, making each cone a perfect balance of creamy and crispy. Plus, the addition of crushed vanilla wafers not only enhances the flavor but also adds an extra layer of crunch.
Another unique aspect is the versatility of this recipe. You can customize it to suit your taste preferences. Whether you want to add chocolate chips, swap out the banana pudding for another flavor, or even make it gluten-free, the possibilities are endless! This adaptability makes the Banana Pudding Cheesecake Cones Recipe a fantastic choice for any occasion.
So, gather your ingredients and get ready to create a dessert that is not only delicious but also visually appealing. These cones are sure to be a hit, bringing smiles and satisfaction to everyone who tries them!
Ingredients for Banana Pudding Cheesecake Cones Recipe
To create the delightful Banana Pudding Cheesecake Cones Recipe, you’ll need a few simple ingredients. Each component plays a vital role in achieving that creamy, dreamy flavor and texture. Here’s what you’ll need:
For the Cheesecake Filling:
- 8 oz cream cheese, softened
- 1/2 cup powdered sugar
- 1 tsp vanilla extract
- 1/2 cup heavy whipping cream
For the Banana Pudding:
- 1 box (3.4 oz) instant banana pudding mix
- 1 1/2 cups cold milk
For Assembly:
- 6 waffle cones
- 1 cup crushed vanilla wafers
- 1 banana, sliced
- Whipped cream (for topping)
- Caramel drizzle (optional)
These ingredients come together to create a deliciously layered dessert that is sure to please. The cream cheese adds richness, while the banana pudding brings a sweet, fruity flavor. The waffle cones provide a fun and crunchy vessel for this delightful treat. So, gather these ingredients and get ready to whip up something special!
Step-by-Step Preparation of Banana Pudding Cheesecake Cones Recipe
Now that you have all your ingredients ready, it’s time to dive into the fun part: preparing your Banana Pudding Cheesecake Cones Recipe. Follow these simple steps to create a delicious dessert that everyone will love!
Step 1: Preparing the Cheesecake Filling
Start by making the cheesecake filling. In a medium-sized bowl, beat the softened cream cheese with a hand mixer. Add the powdered sugar and vanilla extract. Mix until the mixture is smooth and creamy. This should take about 2-3 minutes. Next, in another bowl, whip the heavy cream until stiff peaks form. This means the cream should hold its shape when you lift the beaters. Gently fold the whipped cream into the cream cheese mixture. Be careful not to deflate the whipped cream; you want to keep it light and fluffy!
Step 2: Making the Banana Pudding Layer
Now, let’s move on to the banana pudding layer. In a separate bowl, whisk together the instant banana pudding mix and cold milk. Stir until the mixture thickens, which usually takes about 2 minutes. Let it sit for 5 minutes to set properly. Once it’s thickened, gently fold the banana pudding into the cheesecake filling. This combination creates a rich and creamy layer that will make your cones irresistible!
Step 3: Assembling the Banana Pudding Cheesecake Cones
It’s time to assemble your cones! Start by coating the inside of each waffle cone with crushed vanilla wafers. This adds a nice crunch and helps keep the filling from leaking out. Next, fill each cone with the cheesecake banana pudding mixture. You can use a spoon or a piping bag for a neater look. Don’t be shy; fill them generously! Top each cone with whipped cream, banana slices, and a sprinkle of more crushed wafers. If you like, drizzle some caramel on top for an extra touch of sweetness.
Step 4: Chilling the Cones
After assembling your cones, it’s best to chill them for a bit. You can serve them immediately, but refrigerating them for up to 2 hours allows the flavors to meld beautifully. This also helps the cones hold their shape. Just remember, if you’re not serving them right away, keep them in the fridge until you’re ready to enjoy!
And there you have it! Your Banana Pudding Cheesecake Cones Recipe is now ready to be enjoyed. These steps are simple and fun, making it a great activity for the whole family. Get ready to impress your guests with this delightful treat!
Variations of Banana Pudding Cheesecake Cones Recipe
If you love the Banana Pudding Cheesecake Cones Recipe but want to switch things up, you’re in luck! There are many fun variations you can try. These alternatives allow you to explore different flavors and ingredients while keeping the essence of this delightful dessert.
Alternative Flavors and Ingredients
Why stick to just banana when you can experiment with other flavors? Here are some exciting ideas:
- Chocolate Lovers: Swap the banana pudding for chocolate pudding. Add chocolate chips to the cheesecake filling for an extra chocolatey treat.
- Berry Bliss: Use strawberry or raspberry pudding instead of banana. Top with fresh berries for a fruity twist.
- Peanut Butter Delight: Mix in some creamy peanut butter into the cheesecake filling. This adds a nutty flavor that pairs well with banana.
- Caramel Swirl: Drizzle caramel sauce into the cheesecake mixture before filling the cones. This adds a rich, sweet flavor.
Feel free to get creative! You can mix and match flavors to find your perfect combination. The key is to keep the balance of creamy and crunchy while enjoying new tastes.
Gluten-Free and Dairy-Free Options
For those with dietary restrictions, you can still enjoy these cones! Here are some tips to make your Banana Pudding Cheesecake Cones Recipe gluten-free and dairy-free:
- Gluten-Free Waffle Cones: Look for gluten-free waffle cones at your local store. Many brands offer delicious options that taste just as good.
- Dairy-Free Cream Cheese: Use a dairy-free cream cheese alternative. Brands like Tofutti or Kite Hill work well in this recipe.
- Non-Dairy Whipping Cream: Substitute heavy whipping cream with coconut cream or a non-dairy whipping cream. This will keep the texture light and fluffy.
- Plant-Based Pudding: Choose a dairy-free instant pudding mix. Many brands offer plant-based options that are just as tasty.
With these adjustments, everyone can enjoy the creamy goodness of banana pudding cheesecake cones. So, don’t hesitate to try these variations and make this recipe your own!
Cooking Note for Banana Pudding Cheesecake Cones Recipe
When preparing the Banana Pudding Cheesecake Cones Recipe, there are a few important cooking notes to keep in mind. These tips will help ensure that your dessert turns out perfectly every time!
First, make sure your cream cheese is softened. This step is crucial for achieving a smooth and creamy cheesecake filling. If your cream cheese is too cold, it will be difficult to mix, leading to lumps in your filling. To soften it quickly, you can cut it into small cubes and let it sit at room temperature for about 15-20 minutes.
Next, when whipping the heavy cream, be careful not to over-whip it. Whipping it just until stiff peaks form is key. If you whip it too long, it can turn into butter, which is not what you want for this recipe. Keep an eye on it, and stop as soon as it holds its shape.
Additionally, when folding the whipped cream into the cheesecake mixture, use a gentle hand. This technique helps maintain the light and airy texture of the whipped cream. Use a spatula and fold in a circular motion, scraping the sides of the bowl as you go.
Lastly, if you plan to serve the cones later, consider how the waffle cones will hold up. They can become soggy if filled too early. To prevent this, you can coat the inside of the cones with melted chocolate before adding the filling. This creates a barrier that helps keep the cones crispy longer.
By following these cooking notes, you’ll create delicious and visually appealing Banana Pudding Cheesecake Cones that everyone will love. Enjoy the process and have fun making this delightful treat!
Serving Suggestions for Banana Pudding Cheesecake Cones Recipe
Once you’ve created your delicious Banana Pudding Cheesecake Cones, it’s time to think about how to serve them. These cones are not only tasty but also visually appealing, making them perfect for various occasions. Here are some ideal occasions and pairing suggestions to enhance your dessert experience!
Ideal Occasions for Serving
These delightful cones are versatile and can be served at many events. Here are some occasions where they would shine:
- Birthday Parties: Celebrate with a fun dessert that guests of all ages will love. You can even customize the flavors to match the birthday person’s favorite!
- Picnics: Pack these cones for a sweet treat outdoors. They are easy to transport and make for a delightful dessert in the sun.
- Family Gatherings: Bring everyone together with a dessert that sparks joy. These cones are perfect for sharing and enjoying as a family.
- Holiday Celebrations: Whether it’s a summer barbecue or a winter holiday party, these cones can be adapted to fit any festive theme.
- Movie Nights: Enjoy a cozy night in with these cones as a fun snack. They are easy to eat while watching your favorite films!
Pairing with Other Desserts
While the Banana Pudding Cheesecake Cones are delicious on their own, they can also be paired with other desserts for a delightful dessert spread. Here are some pairing ideas:
- Chocolate Chip Cookies: The classic cookie pairs well with the creamy cones, offering a nice contrast in texture.
- Fruit Salad: A refreshing fruit salad can balance the richness of the cones. Choose seasonal fruits for a colorful addition.
- Ice Cream: Serve a scoop of vanilla or banana ice cream alongside the cones for an extra creamy treat.
- Brownies: Rich, fudgy brownies complement the lightness of the cones, creating a satisfying dessert experience.
- Mini Cupcakes: Offer a variety of mini cupcakes for guests to enjoy alongside their cones. This adds a fun element to your dessert table.
With these serving suggestions, your Banana Pudding Cheesecake Cones will be the star of any gathering. They are sure to bring smiles and satisfaction to everyone who tries them!
Tips for Perfecting Your Banana Pudding Cheesecake Cones Recipe
To ensure your Banana Pudding Cheesecake Cones Recipe turns out perfectly every time, here are some helpful tips. These suggestions will help you avoid common pitfalls and make the most of your delicious dessert!
Common Mistakes to Avoid
Even the best cooks can make mistakes. Here are some common ones to watch out for:
- Using Cold Ingredients: Always use softened cream cheese and cold milk for the pudding. Cold ingredients can lead to lumps in your filling.
- Overmixing the Cream: When whipping the heavy cream, stop as soon as stiff peaks form. Overmixing can turn it into butter, ruining the texture.
- Filling Cones Too Early: If you fill the cones too far in advance, they can become soggy. Fill them just before serving or coat them with chocolate first.
- Skipping the Chill Time: Allowing the cones to chill helps the flavors meld and keeps them from falling apart. Don’t skip this step!
- Not Tasting as You Go: Always taste your filling before assembling. Adjust sweetness or flavor as needed to ensure it’s just right!
Storage Tips for Leftovers
If you have leftover Banana Pudding Cheesecake Cones, here’s how to store them properly:
- Refrigerate: Store any filled cones in an airtight container in the fridge. They can last up to 2 hours without getting soggy.
- Separate Components: If you have leftover filling, store it separately from the cones. This helps keep the cones crispy for longer.
- Use Within a Day: For the best taste and texture, try to consume the cones within a day. The longer they sit, the softer they may become.
- Freeze the Filling: If you have extra filling, consider freezing it in an airtight container. You can use it later for more cones or other desserts!
By following these tips, you’ll be well on your way to creating the perfect Banana Pudding Cheesecake Cones. Enjoy the process and the delicious results!
Breakdown of Time for Banana Pudding Cheesecake Cones Recipe
Understanding the time needed for each step of the Banana Pudding Cheesecake Cones Recipe can help you plan better. Here’s a quick breakdown of the time required for preparation, cooking, and total time.
Prep Time
The prep time for this delightful dessert is quite short. You’ll need about 15 minutes to gather your ingredients and prepare the cheesecake filling and banana pudding. This includes mixing, whipping, and folding the ingredients together. It’s a quick and easy process that makes this recipe perfect for any occasion!
Cooking Time
Interestingly, there’s no actual cooking involved in this recipe! The only time you’ll need to consider is the chilling time. After assembling the cones, it’s best to chill them for about 10 minutes. This allows the flavors to meld and helps the cones hold their shape. If you prefer, you can chill them for up to 2 hours for an even better taste.
Total Time
In total, you’re looking at approximately 25 minutes to prepare and chill your Banana Pudding Cheesecake Cones. This quick time frame makes it easy to whip up these cones for a last-minute dessert or a planned gathering. With minimal effort and time, you can create a delicious treat that everyone will love!
Nutritional Information for Banana Pudding Cheesecake Cones Recipe
Understanding the nutritional content of your Banana Pudding Cheesecake Cones Recipe is essential for making informed choices. This dessert is not only delicious but also provides some nutritional benefits. Here’s a breakdown of the key nutritional information per cone:
Calories
Each Banana Pudding Cheesecake Cone contains approximately 320 calories. This calorie count includes the creamy cheesecake filling, banana pudding, and the crunchy waffle cone. While it’s a sweet treat, it’s important to enjoy it in moderation as part of a balanced diet.
Protein
In terms of protein, each cone offers about 4 grams. The protein mainly comes from the cream cheese and heavy whipping cream used in the filling. Protein is essential for building and repairing tissues, making this dessert a tasty way to get a little boost!
Sodium
Each cone contains around 200 mg of sodium. This amount is relatively moderate, but if you are watching your sodium intake, it’s good to be aware. Most of the sodium comes from the cream cheese and the waffle cone. You can always opt for low-sodium cream cheese to reduce this number if desired.
Overall, the Banana Pudding Cheesecake Cones provide a delightful mix of flavors and textures while offering some nutritional value. Enjoy them as an occasional treat, and feel good about indulging in this creamy dessert!
FAQs about Banana Pudding Cheesecake Cones Recipe
Can I make Banana Pudding Cheesecake Cones ahead of time?
Yes, you can prepare the Banana Pudding Cheesecake Cones ahead of time, but with a few considerations. You can make the cheesecake filling and banana pudding a day in advance. Just store them in airtight containers in the refrigerator. However, it’s best to assemble the cones just before serving. This helps keep the waffle cones crispy and prevents them from getting soggy. If you need to prepare them a few hours in advance, you can fill the cones and refrigerate them for up to 2 hours. Just remember to keep them covered!
What can I substitute for cream cheese in the recipe?
If you’re looking for a substitute for cream cheese in the Banana Pudding Cheesecake Cones Recipe, there are several options. You can use Greek yogurt for a healthier twist. It provides a similar creamy texture and tangy flavor. Another option is to use mascarpone cheese, which is rich and creamy, making it a great alternative. For a dairy-free option, consider using a plant-based cream cheese. Brands like Tofutti or Kite Hill offer delicious alternatives that work well in this recipe.
How do I store leftover Banana Pudding Cheesecake Cones?
To store leftover Banana Pudding Cheesecake Cones, it’s best to keep the components separate. If you have filled cones, place them in an airtight container in the refrigerator. They can last for up to 2 hours without getting soggy. If you have leftover filling, store it in a separate container. This way, you can fill fresh cones later. For the best taste and texture, try to consume the cones within a day. If you have extra filling, you can freeze it for later use!
Can I use fresh bananas instead of banana pudding mix?
Yes, you can use fresh bananas instead of banana pudding mix in the Banana Pudding Cheesecake Cones Recipe. To do this, mash ripe bananas and mix them into the cheesecake filling. You can also layer sliced bananas in the cones for added flavor. However, keep in mind that using fresh bananas will change the texture and flavor profile slightly. The pudding mix provides a creamy consistency and sweetness that fresh bananas alone may not achieve. You might want to add a bit of sugar or vanilla to enhance the flavor if you choose this option!
Conclusion on Banana Pudding Cheesecake Cones Recipe
In conclusion, the Banana Pudding Cheesecake Cones Recipe is a delightful and easy-to-make dessert that brings joy to any occasion. With its creamy cheesecake filling, rich banana pudding, and crunchy waffle cone, this treat is sure to please both kids and adults alike. The combination of flavors and textures creates a fun experience that makes dessert time even more special.
Whether you’re hosting a party, enjoying a family gathering, or simply treating yourself, these cones are a fantastic choice. They are not only visually appealing but also versatile, allowing you to customize them to suit your taste. From chocolate variations to gluten-free options, the possibilities are endless!
Remember to follow the tips and tricks shared throughout this article to ensure your cones turn out perfectly every time. With a little preparation and creativity, you can impress your guests and create lasting memories with this delightful dessert.
So, gather your ingredients, roll up your sleeves, and get ready to whip up some delicious Banana Pudding Cheesecake Cones. Enjoy the process, share the joy, and most importantly, savor every bite of this creamy, dreamy treat!
1 thought on “Banana Pudding Cheesecake Cones are a must-try!”