 Skip to content
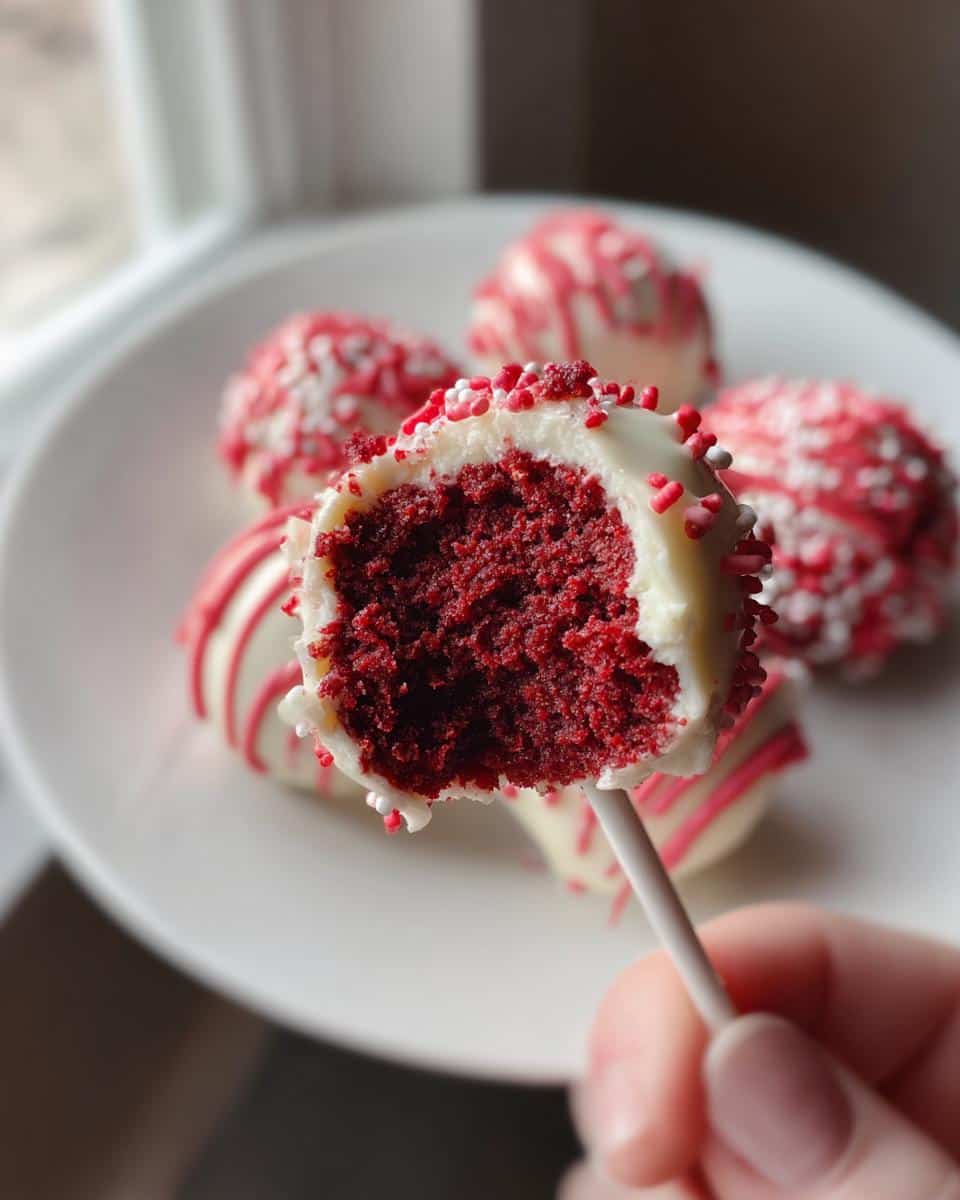
Okay, y’all, let’s talk about something seriously fun: Bloody Red Velvet Cake Pops! I mean, how perfect are these for Halloween? Or, you know, Valentine’s Day if you’re feeling a little… edgy? These aren’t just any cake pops; we’re talking *intense* red color and a flavor that’ll make your taste buds sing. Seriously, you won’t find a more gorgeous, or dare I say, *bloody*, red velvet treat!
Now, I’ve been baking for years, and let me tell you, I’ve had my share of kitchen mishaps. Remember that time I tried to make a simple grilled cheese and somehow set off the smoke alarm? Yep, that was me! I swear, I just walked away for *one second*, and suddenly the whole house smelled like burnt toast. But hey, even with a few charred edges along the way, I learned a thing or two, and I’m here to share all my secrets with you. So, trust me, even if you’re a little nervous about cake pops, this recipe is totally doable. Let’s get spooky… or romantic… or just plain delicious!
Why You’ll Love These Bloody Red Velvet Cake Pops
Quick and Easy Bloody Red Velvet Cake Pops Recipe
Using a cake mix makes these a breeze! No need to be intimidated; I promise, they’re simpler than they look.
Intense Red Color for Spooky Fun
Wow, that color! They’re *perfect* for a Halloween spread or a Valentine’s Day surprise. So dramatic!
Rich Red Velvet Flavor
That classic red velvet tang with a creamy frosting – it’s a flavor explosion in every single bite, y’all!
Perfect for Halloween or Valentine’s day
Seriously, these are a showstopper for *any* spooky or sweet celebration. They fit right in, trust me!
Ingredients for Bloody Red Velvet Cake Pops
Okay, so here’s what you’ll need to whip up these gorgeous, spooky treats. Don’t worry, it’s not a mile-long list! I’ve broken it down to make it super easy. And hey, if you’re missing something, don’t panic! Check out my notes later on for some easy swaps. But first, let’s get organized, y’all!
Cake Ingredients
Grab one box of your fave red velvet cake mix (the standard size, usually around 15-16 oz). You’ll also need the eggs, oil, and water that the box calls for. I usually use large eggs, just so you know!
Frosting Ingredients
For the frosting, you’ll need 8 oz of cream cheese – make sure it’s softened! Half a cup (that’s one stick) of unsalted butter, also softened. Then, 4 cups of powdered sugar, a teaspoon of vanilla extract, and a good squirt of red food coloring gel. Trust me, gel is the way to go for that intense red!
Coating and Decoration
You’ll want 12 oz of red candy melts. I usually grab the Ghirardelli ones, but use whatever you like! Sprinkles or edible glitter (because why not?!), lollipop sticks, and some parchment paper or a cake pop stand to let them dry on.
How to Make Bloody Red Velvet Cake Pops: A Step-by-Step Guide
Alright, here comes the fun part! Follow these steps, and you’ll be wowing everyone with your Bloody Red Velvet Cake Pops in no time. Don’t worry, I’ll walk you through it. We’ll get these done together, y’all.
Baking the Red Velvet Cake
First things first, bake that red velvet cake according to the box instructions. Usually, it’s around 350°F (175°C) for about 30 minutes, but double-check your box! Let it cool *completely* before you even THINK about crumbling it. Trust me on this one; warm cake equals a sticky mess!
Making the Cream Cheese Frosting
While the cake’s cooling, let’s whip up that frosting. In a bowl, beat your softened cream cheese and butter until they’re super smooth. No lumps allowed, y’all! Gradually add in your powdered sugar and vanilla, mixing until everything’s perfectly combined. Now, for the “bloody” part: add that red food coloring gel, a little at a time, until you get the *exact* shade of red you’re going for. This is where you get to be creative!
Creating the Cake Pop Dough
Okay, cake’s cool, frosting’s ready… now the fun *really* begins! Crumble that cooled cake into a big bowl. Add your frosting and mix it all together until you get a dough-like consistency. It should be moist and easy to mold – not too dry, not too sticky. If it’s too wet, add a *tiny* bit more cake; if it’s too dry, add a *smidge* more frosting. You’ll get the hang of it, I promise!
Forming and Coating the Bloody Red Velvet Cake Pops
Now, roll that cake mixture into 1-inch balls. It’s like playing with Play-Doh, but tastier! Melt your red candy melts according to the package directions. Be careful not to burn them! Dip the tip of a lollipop stick into the melted candy and then stick it into a cake ball. This helps the cake pop stay put. Dip each cake pop into the melted candy, tapping off any extra. Decorate with sprinkles or edible glitter *before* the candy sets. Place those beauties in a cake pop stand (or a piece of styrofoam!) to harden. And there you have it: *Bloody Red Velvet Cake Pops*!

Tips for the Best Bloody Red Velvet Cake Pops
Want your Bloody Red Velvet Cake Pops to be total perfection? Of course, you do! Here are a few of my tried-and-true tips to make sure they’re absolutely amazing.
Achieving the Perfect Red Color for Your Bloody Red Velvet Cake Pops
Seriously, y’all, don’t skimp on the gel food coloring! Liquid just won’t cut it if you want that deep, intense “bloody” red. A little goes a long way, so start slow and add more ’til you get the shade you want.
Preventing Sticky Cake Pop Mixture
Oops, did your cake pop mixture turn out a little too… gooey? Don’t panic! Just pop it in the fridge for about 30 minutes to firm up. Chilling makes it *way* easier to roll into neat little balls. Trust me, that step saves a lot of frustration!
Melting Candy Melts Correctly
Melting candy melts can be tricky. Low and slow is the name of the game! Microwave in short bursts (like 30 seconds), stirring in between, to avoid burning. Burnt candy melts are *not* your friend!
Ingredient Notes and Substitutions for Bloody Red Velvet Cake Pops
Okay, so maybe you’re missing an ingredient or two. Don’t sweat it! Here are some easy swaps to keep those Bloody Red Velvet Cake Pops on track. Gotta keep baking, right?
Cream Cheese Substitutions
No cream cheese? No problem! Mascarpone works like a charm for a richer flavor, or you could even try Greek yogurt for a tangier twist. Just make sure it’s plain and thick!
Red Food Coloring Alternatives
Don’t have red food coloring? Beetroot juice can give you a natural (though less intense) red. Just be warned, it might slightly change the flavor and won’t be *quite* as “bloody.”
Candy Melt Variations
Red candy melts not your thing? Go wild with different colors! Dark chocolate, white chocolate, even green for a spooky zombie vibe! Get creative, y’all!
Equipment You’ll Need for Bloody Red Velvet Cake Pops
Alright, let’s gather our gear! You don’t need a ton of fancy stuff to make these Bloody Red Velvet Cake Pops, but a few basics will make your life a whole lot easier, y’all.
Baking Essentials
You’ll need some mixing bowls (a couple of different sizes is always good!), measuring cups and spoons (gotta be precise!), and the baking pan you’re using to bake your cake. Easy peasy!
Cake Pop Tools
Of course, you’ll need lollipop sticks to make these actual pops! A cake pop stand or even just a styrofoam block is super handy for letting them dry without smudging.
Melting Equipment
For melting your candy melts, a microwave-safe bowl works great. Or, if you’re feeling fancy, you can use a double boiler. Just whatever works best for you, y’all!
FAQ About Bloody Red Velvet Cake Pops
How do I get the cake pops to stick to the sticks?
Okay, this is *the* big question, right? The trick is to dip the tip of your lollipop stick into the melted candy *before* you stick it into the cake ball. That little bit of candy acts like glue and keeps everything nice and secure, y’all!
Can I make these Bloody Red Velvet Cake Pops ahead of time?
Absolutely! These Bloody Red Velvet Cake Pops are great for making ahead. Once they’re coated and set, just pop them in an airtight container and store them in the fridge. They’ll be good for several days, so you can prep for that Halloween party in advance!
What can I use if I don’t have red candy melts?
No red candy melts? No problem! You can totally use white chocolate and just add some red food coloring to it. Just be sure to use gel food coloring for the best, most vibrant color, y’all!
Storage & Reheating Instructions for Bloody Red Velvet Cake Pops
Got leftovers? Lucky you! Here’s how to keep those Bloody Red Velvet Cake Pops fresh and delicious. Though, let’s be honest, they probably won’t last long!
Storing Bloody Red Velvet Cake Pops
Pop those beauties in an airtight container and store them in the fridge. They’ll stay good for about a week… if you can resist them that long!
Reheating Bloody Red Velvet Cake Pops
Okay, so, technically, reheating isn’t really recommended. They’re best enjoyed cold! But hey, if you *really* want to, just let them sit at room temperature for a bit to soften up. But trust me, straight from the fridge is the way to go, y’all!
Estimated Nutritional Information for Bloody Red Velvet Cake Pops
Alright, y’all, here’s a *very* rough estimate: each cake pop’s around 250 calories, with 12g of fat, 2g of protein, and 35g of carbs. But hey, it’s cake, so let’s not sweat the small stuff too much, okay?
Leave a Comment and Rate This Bloody Red Velvet Cake Pops Recipe!
Loved these Bloody Red Velvet Cake Pops? Leave a comment and let me know what you think, y’all! And don’t forget to rate the recipe!
Print
Bloody Red Velvet Cake Pops: A Wicked Delicious Recipe
- Total Time: 2 hours
- Yield: 24 cake pops 1x
- Diet: Vegetarian
Description
Create striking Bloody Red Velvet Cake Pops. This recipe delivers a deep red color and rich flavor, perfect for Halloween or any spooky occasion.
Ingredients
- 1 box red velvet cake mix
- Eggs, oil, and water as called for on cake mix box
- 8 oz cream cheese, softened
- 1/2 cup unsalted butter, softened
- 4 cups powdered sugar
- 1 teaspoon vanilla extract
- Red food coloring gel
- 12 oz red candy melts
- Sprinkles or edible glitter for decoration
- Lollipop sticks
Instructions
- Bake the red velvet cake according to box instructions. Let cool completely.
- Crumble the cooled cake into a large bowl.
- In a separate bowl, beat cream cheese and butter until smooth.
- Gradually add powdered sugar and vanilla extract, mixing until fully combined.
- Add red food coloring gel until you achieve your desired ‘bloody’ red color.
- Mix the frosting into the crumbled cake until a dough forms.
- Roll the cake mixture into 1-inch balls.
- Melt the red candy melts according to package directions.
- Dip the tip of a lollipop stick into the melted candy and insert into a cake ball.
- Dip each cake pop into the melted candy, tapping off excess.
- Decorate with sprinkles or edible glitter before the candy coating sets.
- Place cake pops in a stand or on parchment paper to harden.
Notes
- For an intense red color, use gel food coloring. Liquid food coloring may not achieve the desired shade.
- Ensure cake is completely cooled before crumbling to prevent a sticky mess.
- If the cake pop mixture is too soft, chill it in the refrigerator for 30 minutes before rolling.
- Melt candy melts slowly to avoid burning.
- Prep Time: 30 minutes
- Cook Time: 30 minutes
- Category: Dessert
- Method: Baking
- Cuisine: American
Nutrition
- Serving Size: 1 cake pop
- Calories: 250
- Sugar: 30g
- Sodium: 150mg
- Fat: 12g
- Saturated Fat: 8g
- Unsaturated Fat: 3g
- Trans Fat: 0g
- Carbohydrates: 35g
- Fiber: 1g
- Protein: 2g
- Cholesterol: 30mg