

You know, when I think about gathering people, it always starts with what’s on the table. It’s more than just food; it’s about creating a feeling, a moment. And that’s exactly what the charcuterie board aesthetic is all about! It’s not just piling stuff on a board; it’s an art form, really. My grandmother always said a meal should look as good as it tastes, and I carry that with me. We’re talking about creating these gorgeous, vibrant displays that just beg to be shared, both on your plate and on your feed. It’s about making something beautiful that brings everyone together, just like the big Sunday dinners back home.
Why You’ll Love This Charcuterie Board Aesthetic
Honestly, creating a beautiful charcuterie board is one of my favorite ways to entertain. It looks so impressive, but trust me, it’s surprisingly easy! You don’t need to be a gourmet chef to pull this off. It’s perfect for everything from a casual afternoon get-together to a more formal party. It just makes people feel special.
Effortless Elegance for Any Gathering
This aesthetic is all about making entertaining feel less like a chore and more like a joy. You can whip up a stunning board in minutes, and it instantly elevates any occasion. It’s the perfect centerpiece that says, “I care about this, and I want you to feel welcomed and special.”
A Feast for the Eyes and Palate
It’s true what they say – we eat with our eyes first! This charcuterie board aesthetic delivers that wow factor. The colors, the textures, the sheer variety… it’s a delight to look at. And then, of course, comes the taste. Every bite is a little adventure, mixing and matching those delicious combinations.
Essential Elements for Your Charcuterie Board Aesthetic
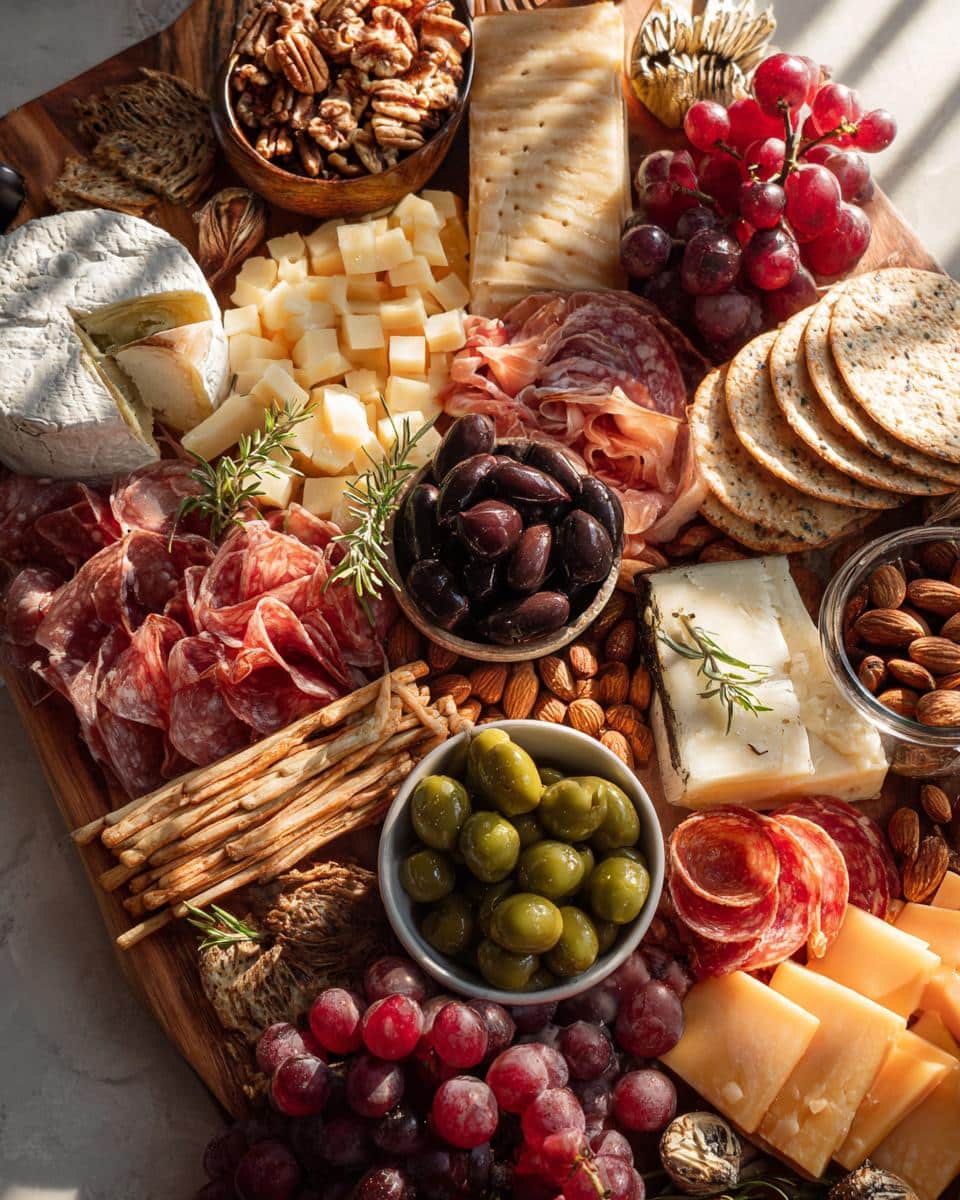
Alright, let’s talk about what actually goes ON the board to get that gorgeous charcuterie board aesthetic we’re all after. Think of it like painting a picture, but with really delicious ingredients! You want a good mix of everything so there’s something for everyone, and it looks like a little edible work of art. It’s all about selecting the right players to make your board truly shine.
Selecting Your Cheeses: The Foundation of Your Charcuterie Board Aesthetic
The cheese is really the star of the show, right? For that perfect charcuterie board aesthetic, you’ve got to have variety. I always try to grab a mix – something hard and crumbly like an aged cheddar, something soft and creamy like brie or goat cheese, and maybe a semi-soft one too, like a Gouda. Different textures and flavors make it so much more interesting to nibble on.
Cured Meats: Adding Savory Depth to Your Charcuterie Board Aesthetic
Next up, the meats! These really add that savory punch and look fantastic. For that killer charcuterie board aesthetic, don’t just lay them flat. Fold salami into quarters, roll up prosciutto, or fan out chorizo slices. It gives the board dimension and makes it so much more inviting. It’s those little presentation details that make all the difference.
Fruits and Nuts: Bringing Color and Crunch to Your Charcuterie Board Aesthetic
Now, for the color and texture! Fresh fruits are a must for that vibrant charcuterie board aesthetic. Think juicy grapes, bright berries, or some lovely figs. Dried fruits like apricots or dates add a chewy sweetness. And don’t forget the nuts – almonds, walnuts, pistachios – they add a great crunch and fill in those little gaps beautifully. They really pop against everything else.
The Supporting Cast: Crackers, Olives, and Dips
You can’t forget the goodies that tie it all together! A good assortment of crackers and breadsticks is essential for scooping up all those delicious cheeses and meats. And then there are the little extras that really elevate the board – salty olives or cornichons for a briny bite, and of course, some creamy honey, a tangy mustard, or a sweet jam for dipping. They just complete the whole picture!
Step-by-Step Guide to Achieving a Stunning Charcuterie Board Aesthetic
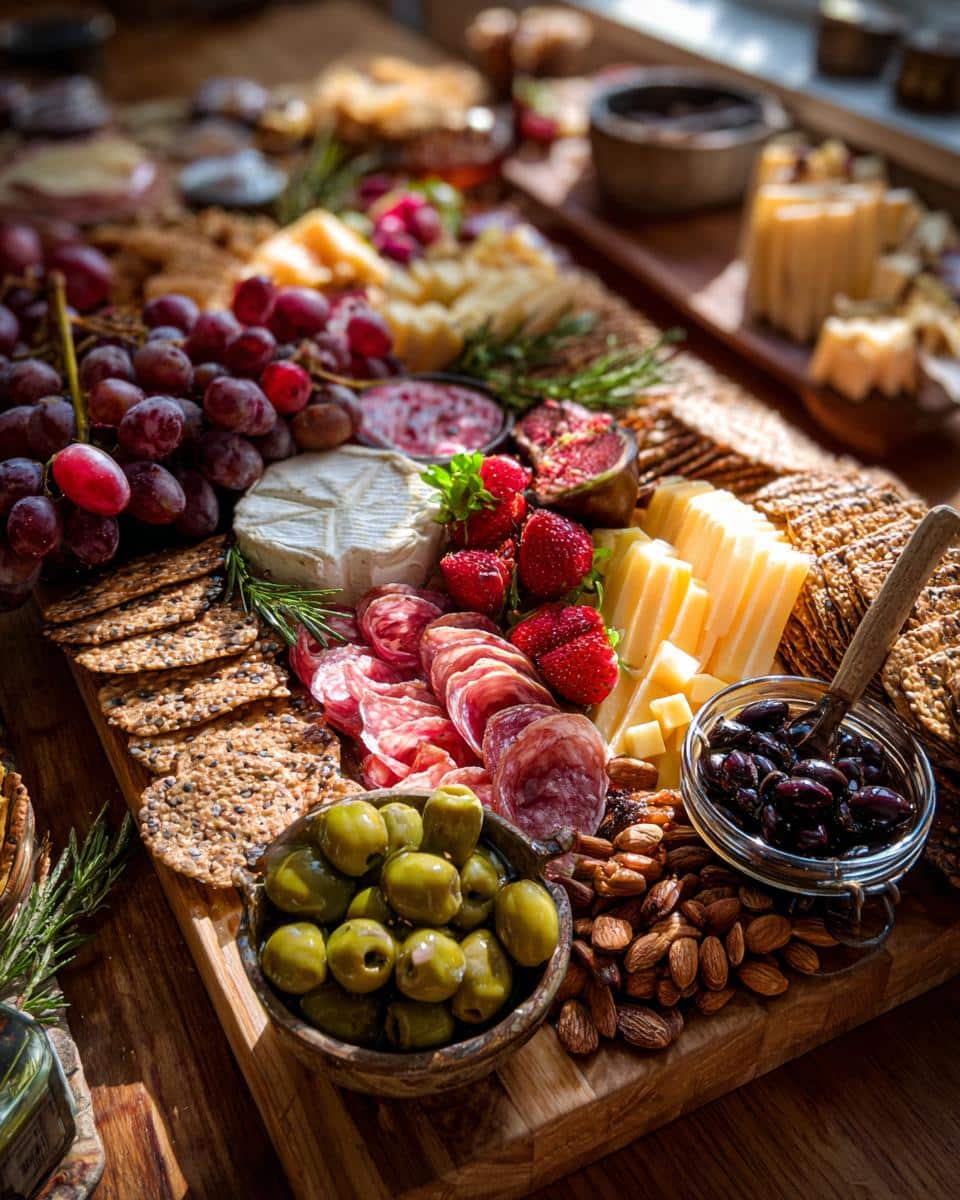
Alright, let’s get this board put together! Creating that gorgeous charcuterie board aesthetic is all about building it up layer by layer, kind of like how my Grandma would layer flavors in her cooking. It’s not complicated, I promise! Just follow these simple steps, and you’ll have a masterpiece in no time.
Step 1: Choose Your Canvas
First things first, you need a good base. My go-to is a big, beautiful wooden board or a nice platter. It just feels so natural and rustic! It’s like the frame for your edible artwork, so pick something you love that’s big enough for all your goodies.
Step 2: Strategic Cheese Placement
I like to start with the cheeses. Place your different cheeses around the board first, giving them a little breathing room. Don’t smoosh them all together! Think about spreading them out so they’re easy to access and look like intentional focal points. It’s the backbone of that lovely charcuterie board aesthetic.
Step 3: Artful Meat Arrangement
Now, let’s add those savory meats! Instead of just laying them flat, get a little creative. Fold salami into quarters, roll up slices of prosciutto like little ribbons, or fan out chorizo. This adds texture and visual interest, making your board look so much more thoughtful and appealing.
Step 4: Filling the Gaps Creatively
This is where the magic really happens for that charcuterie board aesthetic! Take your fruits, nuts, and olives and tuck them into all the little spaces between the cheese and meat. Pile up those grapes, scatter the berries, nestle the nuts in. It makes the board look full, abundant, and so inviting. It’s all about creating abundance!
Step 5: Incorporating Crackers and Bowls
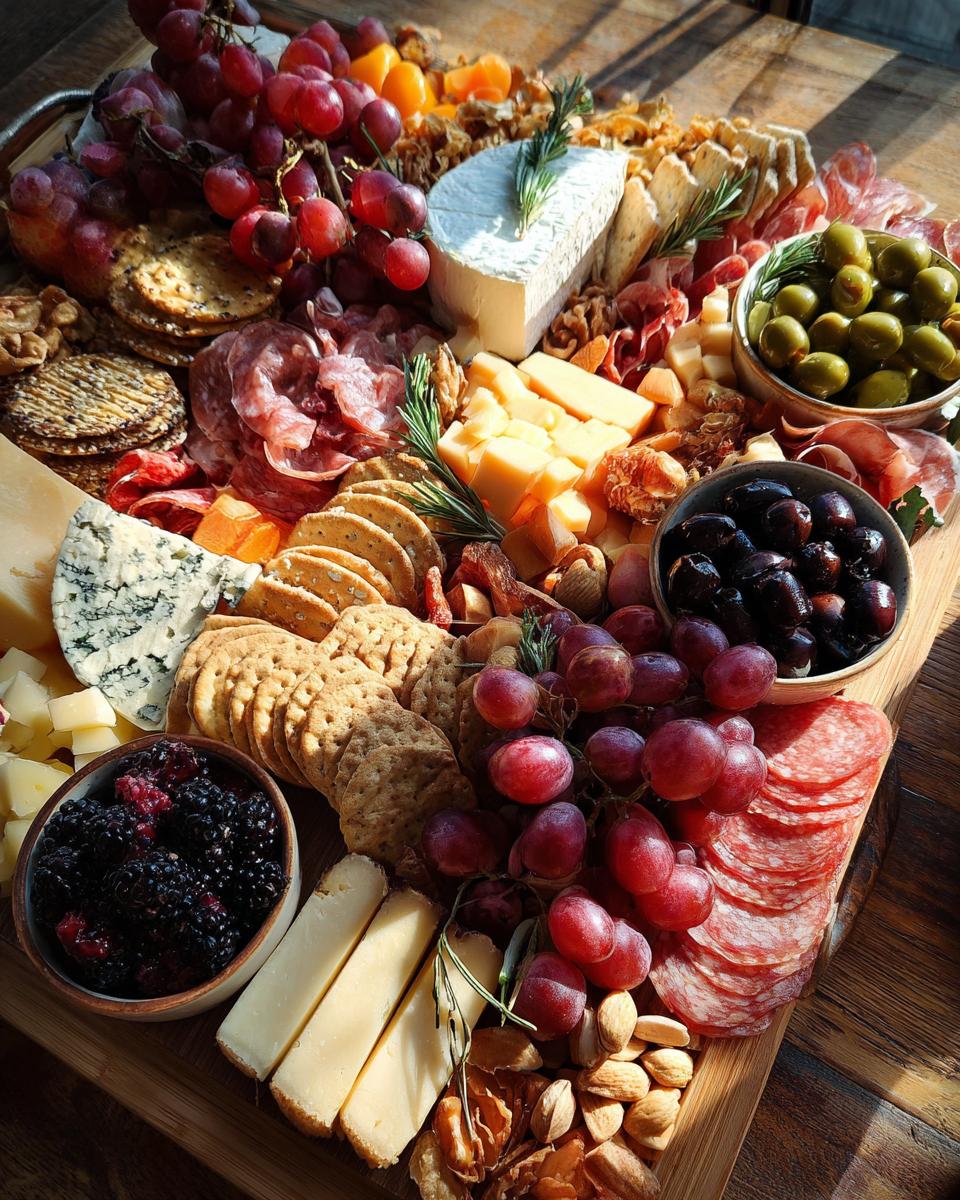
Now, let’s add the dippers and the vessels. Place your crackers and breadsticks around the edges of the board, or maybe fan them out in a few spots. Small bowls are perfect for your dips, honey, mustard, or olives. Tuck these in where they feel balanced. It keeps things tidy and adds little pops of interest.
Step 6: The Finishing Touch: Garnish
Almost there! To really nail that charcuterie board aesthetic, we need a little green. Grab some fresh rosemary sprigs or thyme. Tuck them in here and there around the board. They add a lovely pop of color and a fresh, aromatic scent that just completes the whole beautiful presentation.
Tips for an Unforgettable Charcuterie Board Aesthetic
Want to take your board from good to absolutely stunning? It’s all about those little details that really make the charcuterie board aesthetic sing. Think of it as layering flavors and colors, just like I learned from my Grandma’s kitchen. A little attention here and there makes all the difference!
Consider a Cohesive Color Palette
Picking a color scheme can really elevate your board. Maybe go for jewel tones with berries and prosciutto, or something brighter with citrus and yellow cheeses. It makes the whole presentation pop and feel super intentional and pretty!
Embrace Texture and Flavor Contrast
Don’t be afraid to mix things up! Creamy cheeses next to crunchy nuts, sweet fruits with briny olives – that contrast is what makes a charcuterie board so exciting to eat. It creates little flavor explosions with every bite, and that’s key to that amazing, unforgettable charcuterie board aesthetic.
Frequently Asked Questions about Charcuterie Board Aesthetic
I get asked a lot about making these boards look so good, and honestly, it’s all about a few key things that really make that charcuterie board aesthetic shine. Don’t worry, it’s totally doable!
What makes a charcuterie board have a good aesthetic?
It’s really about the visual appeal! Think a variety of colors, textures, and shapes all arranged thoughtfully. Using different cheeses, meats, colorful fruits, and even some fresh herbs for garnish really makes a board pop. It’s like creating a little edible landscape!
How do I arrange my charcuterie board for a pretty look?
Start with your bigger items like cheeses, spacing them out. Then, fold or fan your meats and tuck them in around the cheeses. Fill in the remaining spaces with your fruits, nuts, and olives. Think about flow and balance – it should look abundant but not messy. It’s all about creating that beautiful, inviting charcuterie board arrangement.
Can I make a charcuterie board aesthetic with just a few ingredients?
Absolutely! You don’t need a million things. If you have a couple of great cheeses, some nice crackers, and a bowl of olives or some fruit, you can still create a lovely look. Focus on arranging those few items really well, maybe add a sprig of rosemary, and you’ve got yourself a simple yet effective DIY charcuterie board that’s still really pretty!
Ingredient Notes and Substitutions for Your Charcuterie Board Aesthetic
Sometimes you might not have exactly what’s listed, or maybe you have some dietary needs, and that’s totally okay! The beauty of building a board for that perfect charcuterie board aesthetic is that it’s super flexible. Don’t stress if you need to swap things out; the goal is to make it delicious and beautiful for *you* and your guests.
Cheese Alternatives
If you can’t find a specific cheese, don’t worry! Think about texture and flavor. If you can’t find brie, a creamy camembert or even a soft goat cheese works beautifully. For hard cheeses, an aged cheddar, Gruyère, or Manchego are all fantastic choices. Just aim for a good variety!
Meat-Free Options
For my vegetarian friends, or if you just want to lighten things up, there are some great options! Roasted red peppers, marinated artichoke hearts, or even some grilled halloumi slices can add a lovely savory element. Hummus or a good white bean dip also work wonders and add a creamy texture that’s just divine.
Fruit and Nut Swaps
Seasonality is your friend here! If figs aren’t in season, try some lovely pears or apples. Blueberries or raspberries are always great for a pop of color. And for nuts, whatever you have on hand works. Pecans, cashews, or even some toasted pumpkin seeds add that needed crunch and flavor contrast to your beautiful charcuterie boards.
Serving and Storing Your Beautiful Charcuterie Boards
Once you’ve put all that effort into creating one of those gorgeous beautiful charcuterie boards, you want to make sure it stays looking and tasting its best! It’s really not complicated, but a few little tips can make a big difference.
Best Practices for Serving
The best way to serve your masterpiece is usually at room temperature. Take your cheeses out of the fridge about 30 minutes before guests arrive so they soften up nicely. This really helps bring out their full flavor. Arrange everything just before your guests are ready to dig in so it stays fresh and vibrant!
Storing Leftovers
Don’t you hate when you have leftovers? If you’ve got some bits and bobs left, the easiest way to store them is to carefully wrap any leftover cheeses individually in wax paper or parchment paper, then pop them into a container. Meats can be wrapped tightly in plastic wrap. Keep everything in the fridge, and try to use them up within a couple of days!
Share Your Charcuterie Board Aesthetic!
Now it’s your turn to create some magic! I’d absolutely love to see what you come up with. Go ahead and make your own stunning charcuterie board aesthetic and share it with me. Tag me or drop a comment below – seeing your beautiful creations is the best part of all this!
Print
Stunning charcuterie board aesthetic with 5 tips
- Total Time: 20 minutes
- Yield: Serves 4-6
- Diet: Vegetarian
Description
Create a stunning and visually appealing charcuterie board that’s perfect for any occasion. Learn how to arrange cheeses, meats, fruits, and crackers for a beautiful and delicious presentation.
Ingredients
- Assortment of cheeses (hard, soft, semi-soft)
- Variety of cured meats (salami, prosciutto, chorizo)
- Fresh fruits (grapes, berries, figs)
- Dried fruits (apricots, dates)
- Crackers and breadsticks
- Nuts (almonds, walnuts, pistachios)
- Olives and cornichons
- Dips and spreads (honey, mustard, jam)
- Fresh herbs (rosemary, thyme) for garnish
Instructions
- Select a variety of cheeses with different textures and flavors.
- Arrange the cheeses on your board, leaving space between them.
- Add cured meats, folding or fanning them for visual appeal.
- Fill in gaps with fruits, nuts, and olives.
- Place crackers and breadsticks around the edges or in small bowls.
- Add small bowls for dips and spreads.
- Garnish with fresh herbs for a final touch.
Notes
- Use a large wooden board or platter as your base.
- Consider a color palette for your ingredients.
- Don’t be afraid to mix and match textures and flavors.
- Think about the flow and balance of the board.
- Add small labels for cheeses if desired.
- Prep Time: 20 minutes
- Cook Time: 0 minutes
- Category: Appetizer
- Method: Assembly
- Cuisine: American
Nutrition
- Serving Size: 1 board
- Calories: N/A
- Sugar: N/A
- Sodium: N/A
- Fat: N/A
- Saturated Fat: N/A
- Unsaturated Fat: N/A
- Trans Fat: N/A
- Carbohydrates: N/A
- Fiber: N/A
- Protein: N/A
- Cholesterol: N/A