 Skip to content

Oh, you guys! Remember those super satisfying moments as a kid when you found a hidden trove of chocolates? For me, it wasn’t just about the chocolate, it was the burst of cherry goodness inside that always felt like pure magic. That feeling is exactly what inspired these amazing Chocolate Covered Cherry Magic Bars, and let me tell you, they live up to the name! These aren’t just a dessert; they’re a little bite of nostalgia, totally fuss-free, and guaranteed to bring smiles. They’re perfect for when you need something delicious without a lot of drama. Trust me, you’re going to want to make these for every get-together, or, let’s be real, just for yourself on a Tuesday night. No judgment here!
Why You’ll Love These Chocolate Covered Cherry Magic Bars
Okay, so why are these Chocolate Covered Cherry Magic Bars about to become your new favorite obsession? Well, let me tell you! They’re just so effortlessly good, hitting all those sweet and fruity notes that just make you happy. You’re going to fall in love with them because:
- They’re ridiculously easy to make! Seriously, just a few simple steps and you’re good to go. Perfect for when that dessert craving hits hard.
- That flavor combo? Chef’s kiss! Chocolate and cherry are a match made in heaven, and these bars really let them shine.
- They’re super versatile. Bring them to a potluck, pack them for a picnic, or just keep a stash for yourself for a little everyday joy.
- No fancy equipment needed. Just a baking pan and a spoon, and you’re ready to create some deliciousness.
Gather Your Ingredients for Chocolate Covered Cherry Magic Bars
Alright, friends, let’s get down to business! You’ll be amazed at how simple the ingredient list is for these incredible Chocolate Covered Cherry Magic Bars. Most of these are probably already hanging out in your pantry, waiting for their moment to shine. Just grab these essentials, and we’ll be well on our way to magic-bar heaven – trust me, you won’t regret it!
- 1 1/2 cups graham cracker crumbs
- 1/2 cup (1 stick) unsalted butter, melted
- 1 (14 ounce) can sweetened condensed milk
- 1 cup chocolate chips (your favorite kind!)
- 1 cup dried cherries
- 1 cup chopped pecans
- 1 cup shredded coconut

How to Prepare Your Chocolate Covered Cherry Magic Bars
Okay, now for the fun part: putting it all together! Don’t you just love how simple these magic bars are? You’re going to feel like a total kitchen wizard after this. Just follow these steps, and in no time, your kitchen will smell absolutely heavenly, trust me!
First things first, let’s get that oven ready. You’ll want to preheat it to 350°F (that’s 175°C) and grab your trusty 9×13 inch baking pan. Line it with parchment paper – seriously, this little step is a game-changer for easy removal, so don’t skip it! It’ll save you a headache later.
Next up, the base! In a medium bowl, mix those graham cracker crumbs with your melted butter until they’re all cozy together. Then, press that mixture firmly and evenly into the bottom of your prepared pan. Really get in there and make it nice and compact; this is the foundation of our deliciousness!
Now for the “magic”! Grab that can of sweetened condensed milk and pour it evenly right over the crust. Don’t worry about trying to spread it perfectly; it’ll settle. It’s doing its sweet, sticky work, creating that dreamy caramel-like layer.
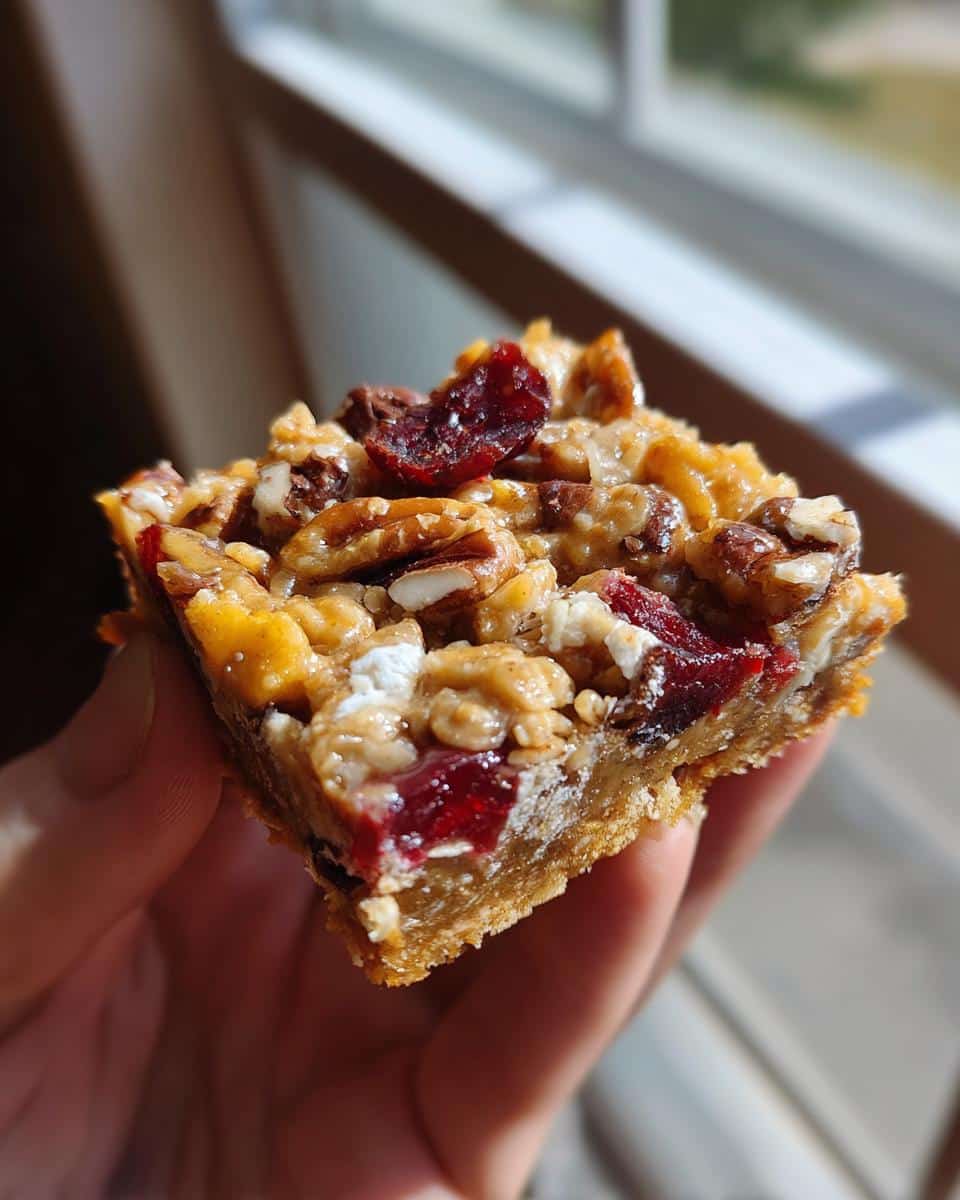
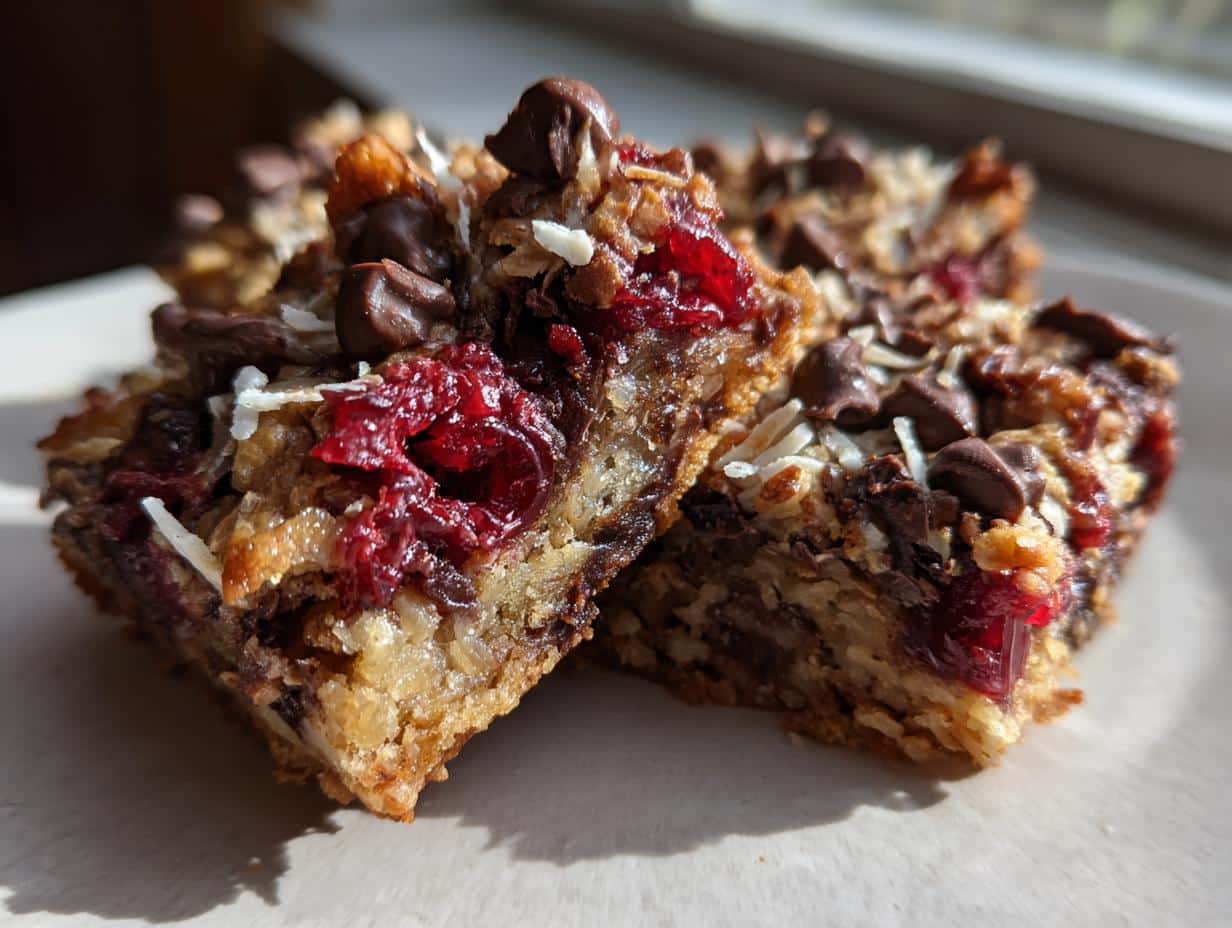
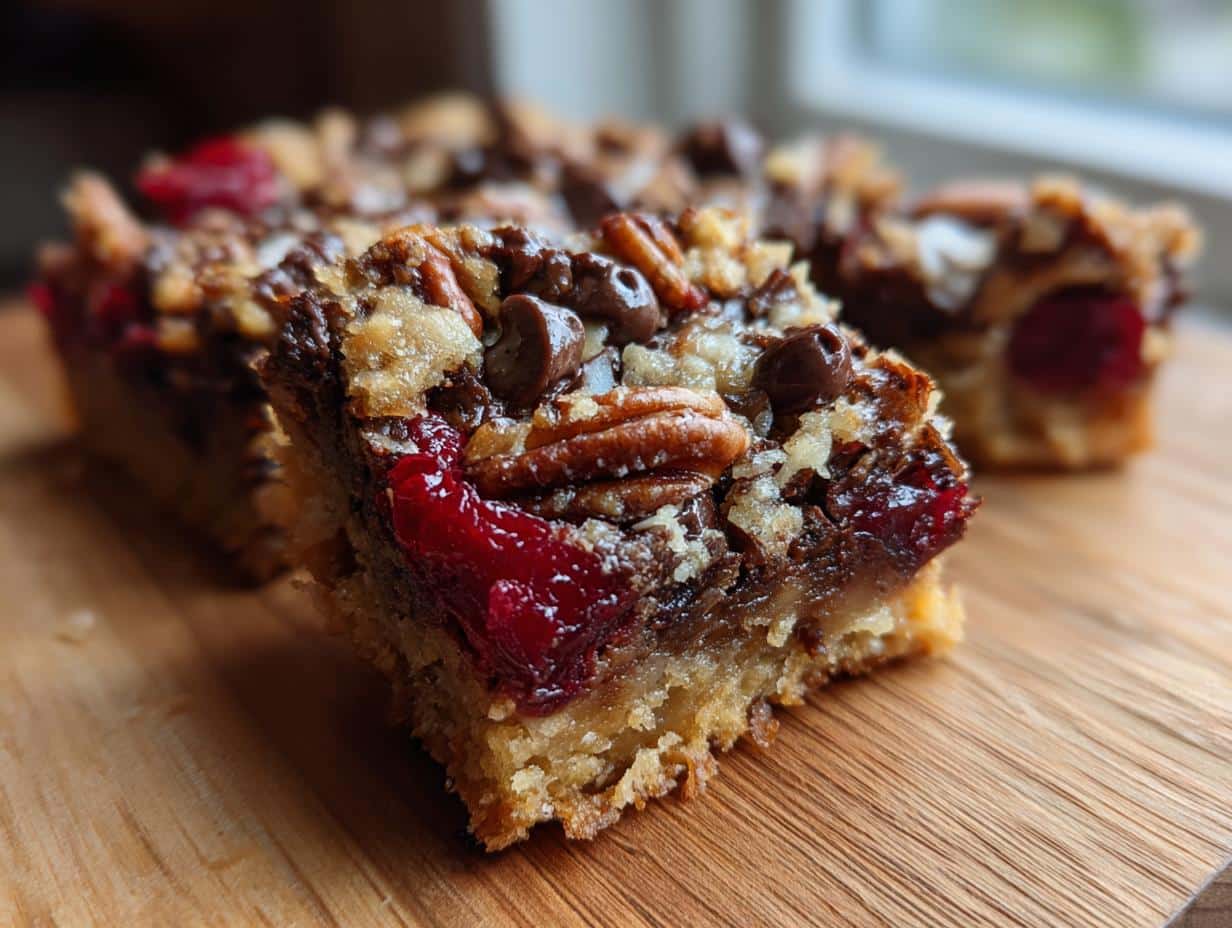
Here’s where the “cherry” part of our Chocolate Covered Cherry Magic Bars really comes in! Now, layer all your goodies over that condensed milk: first the chocolate chips, then those lovely dried cherries, followed by the chopped pecans, and finally, a nice scattering of shredded coconut. Just pile them on! It’s going to look and feel abundant, and that’s exactly what we want.
Pop that pan into your preheated oven and let it bake for about 25-30 minutes. You’re looking for the edges to be beautifully golden brown and the top to be set – not overly jiggly. Once it’s done, take it out and, oh, this is the hardest part: let it cool completely before you even *think* about cutting into those perfect bars. Trust me, waiting is worth it for clean, delicious squares!
Tips for Perfect Chocolate Covered Cherry Magic Bars
So, you’ve got the basics down for our Chocolate Covered Cherry Magic Bars, right? Now, let’s talk about those little kitchen secrets that turn a good-enough batch into an absolute showstopper. These aren’t just rules; they’re my personal whispers of wisdom to help you nail it every single time!
- Don’t skimp on quality ingredients! Seriously, good chocolate chips make a huge difference. And those dried cherries? Go for the plump, juicy kind. The better your ingredients, the better your bars will taste. It’s like building a house – you need a solid foundation!
- Press that crust FIRMLY. I know I mentioned it before, but it’s worth repeating. A well-compacted graham cracker crust prevents crumbling and gives you a nice, sturdy base for all those yummy toppings. Think of it as gently, but firmly, tucking it into bed.
- Even layers are happy layers. Try to distribute your chocolate chips, cherries, nuts, and coconut as evenly as possible. This makes sure every single bite of your Chocolate Covered Cherry Magic Bars has a little bit of everything. No one wants a bare spot!
- Patience, my friend, patience! Waiting for the bars to cool *completely* before cutting is probably the hardest test of willpower, but it’s crucial. Warm bars will fall apart and be a gooey mess. Chilling them for a bit, even in the fridge, can make for super clean cuts, just like with my favorite chocolate chip cookies!
Variations on Chocolate Covered Cherry Magic Bars
So, you’ve mastered the classic Chocolate Covered Cherry Magic Bars, right? Now, are you ready to get a little wild and make them truly *your* own? That’s the beauty of baking, you know – making a recipe sing with your own personal flair! These bars are super forgiving and welcome all sorts of delightful little tweaks. Don’t be shy; grab those extra goodies from your pantry and let’s make some magic!
- Nutty creations: Not a pecan fan? No worries! Swap them out for walnuts, almonds, or even
pistachios. Each nut brings its own unique flavor and crunch, so play around! - Chocolate adventure: While semi-sweet chocolate chips are classic, why limit yourself? Try dark chocolate for a richer, more intense flavor, or even white chocolate for a sweeter, creamy twist. You could even do a mix!
- Fruity fun: If dried cherries aren’t speaking to you, dried cranberries or chopped dried apricots would be amazing. They’d add a different kind of tang and texture that’s equally delicious.
- A little spice: Sometimes, I’ll sprinkle a tiny pinch of cinnamon or cardamom over the condensed milk layer before the toppings go on. It just adds that extra little something-something that makes people go, “Hmm, what’s that delicious flavor?”
Storing and Serving Your Chocolate Covered Cherry Magic Bars
Okay, so you’ve made these glorious Chocolate Covered Cherry Magic Bars, and somehow, by some miracle, there are still some left! (Seriously, how did you manage that? Mine usually disappear in minutes!) Keeping them fresh is super simple, so you can enjoy them for days.
To store them, just pop your leftover bars into an airtight container. They’ll be perfectly happy at room temperature for up to 3 days. If you want them to last a bit longer, like up to a week, tuck them into the refrigerator. Personally, I love them chilled – that slightly firm, fudgy texture is just divine!
As for serving, these bars are fantastic just as they are, straight from the container. But if you’re feeling a little fancy, a small scoop of vanilla bean ice cream or a dollop of fresh whipped cream would be absolutely heavenly alongside them. Oh, and a hot cup of coffee or tea? Perfection!
Frequently Asked Questions About Chocolate Covered Cherry Magic Bars
Okay, friends, I know you’ve probably got some questions buzzing around in your head about these amazing Chocolate Covered Cherry Magic Bars. Don’t worry, that’s totally normal! I get asked all sorts of things in my kitchen, so let’s tackle a few common ones that might pop up. I want you to feel super confident when you’re whipping up a batch of these glorious dessert bars!
Can I use fresh cherries in Chocolate Covered Cherry Magic Bars?
Oh, I love your ambition! While fresh cherries are delicious, they bring a lot more moisture than dried ones. If you really want to try them, you’d need to pit them and likely pat them *very* dry, maybe even roast them a bit first to reduce the water content. Honestly, for these magic bars, the dried cherries really are the star – they give you that intense flavor without making the bars soggy. So, I’d stick with dried for the best results!
How do I prevent my Chocolate Covered Cherry Magic Bars from sticking?
Great question! Nothing’s worse than having your beautiful Chocolate Covered Cherry Magic Bars get stuck, right? My absolute go-to secret weapon is parchment paper. Just line your 9×13 inch pan with parchment paper, leaving a little overhang on the sides. Once the bars are completely cool (and bonus points if you chill them!), you can lift the entire slab right out of the pan. It’s like magic! A good non-stick spray can help too, but parchment paper is my absolute favorite for spotless removal.
Nutritional Information for Chocolate Covered Cherry Magic Bars
Alright, for those of you who like to keep an eye on what you’re munching, I’ve got some estimated nutritional info for these Chocolate Covered Cherry Magic Bars. Now, please remember, this is really just an estimate! The exact numbers can totally shift depending on the specific brands of chocolate chips, nuts, or even the size of your dried cherries. So, think of this as a friendly guideline, not a strict rule, okay?
Share Your Chocolate Covered Cherry Magic Bars Experience!
So, you’ve made them, you’ve tasted them, and hopefully, you’re absolutely in love with these Chocolate Covered Cherry Magic Bars! Now, I want to hear ALL about it! Did you make any fun variations? Did they disappear in ten seconds flat at your family gathering? Please, oh please, drop a comment below and let me know how it went! Your feedback really means the world to me, and it helps other home cooks too. And if you snapped a pic (I know you did!), share it on your favorite social media and tag me! I just love seeing your kitchen creations!
Print
Chocolate Covered Cherry Magic Bars
- Total Time: 45 min
- Yield: 24 bars 1x
- Diet: Vegetarian
Description
These bars combine chocolate and cherry flavors. They are easy to make and suitable for dessert or a snack.
Ingredients
- 1 1/2 cups graham cracker crumbs
- 1/2 cup (1 stick) unsalted butter, melted
- 1 (14 ounce) can sweetened condensed milk
- 1 cup chocolate chips
- 1 cup dried cherries
- 1 cup chopped pecans
- 1 cup shredded coconut
Instructions
- Preheat oven to 350°F (175°C). Line a 9×13 inch baking pan with parchment paper.
- In a medium bowl, combine graham cracker crumbs and melted butter. Press mixture evenly into the bottom of the prepared pan.
- Pour sweetened condensed milk evenly over the crust.
- Layer chocolate chips, dried cherries, chopped pecans, and shredded coconut over the condensed milk.
- Bake for 25-30 minutes, or until the edges are golden brown and the top is set.
- Let cool completely before cutting into bars.
Notes
- For easier cutting, chill the bars in the refrigerator for at least 30 minutes before slicing.
- Store leftover bars in an airtight container at room temperature for up to 3 days or in the refrigerator for up to 1 week.
- Prep Time: 15 min
- Cook Time: 30 min
- Category: Dessert
- Method: Baking
- Cuisine: American
Nutrition
- Serving Size: 1 bar
- Calories: 250
- Sugar: 25g
- Sodium: 120mg
- Fat: 15g
- Saturated Fat: 8g
- Unsaturated Fat: 5g
- Trans Fat: 0g
- Carbohydrates: 30g
- Fiber: 2g
- Protein: 3g
- Cholesterol: 20mg