 Skip to content
Okay, picture this: it’s a chilly morning, you’re scrolling through Pinterest, and BAM! These fluffy, dreamy things pop up – Cloud eggs! Or, as some folks call ’em, Cloud toast! I mean, who wouldn’t want to start their day with something that looks like it floated straight out of a fairytale, you know? It’s seriously the *best* of both worlds, all that comfort food goodness AND that amazing aesthetic. And the best part? They’re ridiculously easy to make.

I remember the first time I tried making Cloud eggs (Cloud toast). I was a little skeptical, if I’m honest. Whipped egg whites? Baking them? It sounded a bit… extra. But trust me, it’s totally worth the teeny bit of effort! Once you nail it (and you WILL!), you’ll be making these every weekend. They’re just too fun and yummy not to! Plus, it is such a simple Cloud eggs (Cloud toast) idea!
Why You’ll Love This Cloud Eggs (Cloud Toast) Recipe
Okay, seriously, why *wouldn’t* you love this recipe? Gimme a sec – let me count the ways!
- It’s ready in, like, *minutes*. Seriously, under 15!
- You probably already have all the stuff you need. (Eggs ahoy!)
- Helloooo, gorgeous presentation! #pinterestworthy
- Fluffy, salty, cheesy… pure comfort food heaven!
- Breakfast? Brunch? Snack? Dinner?! Cloud eggs are always welcome!

Ingredients for Delicious Cloud Eggs (Cloud Toast)
Alright, let’s raid the fridge! This Cloud eggs (Cloud toast) recipe is super forgiving, but here’s what *I* usually grab:
- 2 large eggs (the fresher, the better!)
- Salt and pepper, to taste (duh!)
- About 1/4 cup shredded cheese. Gruyère is my go-to, but Parmesan works great too. Cheddar? Hey, why not!
- Optional Toppings: This is where you get fancy! I love chives, but fresh herbs like thyme or even a pinch of red pepper flakes are awesome.
- Toast for serving: Use your fave! Sourdough? Wheat? Go wild!
How to Prepare Perfect Cloud Eggs (Cloud Toast): Step-by-Step Instructions
Okay, ready to make some magic? Don’t worry, it’s easier than you think! Just follow these steps, and you’ll be Instagramming your cloud eggs in no time. Trust me!
- First things first, **preheat your oven to 400°F (200°C).** Don’t skip this! A hot oven is key for getting those fluffy whites.
- **Separate the egg whites from the yolks.** This is where you channel your inner chef. I use the shell-to-shell method – carefully pass the yolk back and forth between the two halves of the shell, letting the white drip into a bowl. Make sure you get *all* the yolk out of the whites. A little yolk will keep those whites from whipping up properly. Place the whites in a clean, dry bowl and the yolks in a separate small bowl, okay?
- **Whip the egg whites with a mixer until stiff peaks form.** This is where the “cloud” happens! You’ll want to use a mixer (handheld or stand mixer – both work great!). Start on low speed and gradually increase to high. Keep whipping until the whites are super fluffy and form stiff, glossy peaks when you lift the beaters. What are stiff peaks? They stand up straight when you pull the beaters out. If they droop, keep whipping!
- **Gently fold in the cheese and any desired seasonings.** Don’t deflate those gorgeous whites! Use a spatula and gently fold in the cheese and your seasonings, being careful not to overmix. Overmixing will knock the air out.
- **Spoon the egg white mixture onto a baking sheet lined with parchment paper, making two nests.** Parchment paper is your friend! I skip it sometimes and totally regret it!. Make two little mounds of the egg white mixture (or however many eggs you’re making!). Make a little indentation in the center of each nest – that’s where the yolk will go!
- **Bake for 3-5 minutes, or until the egg whites are lightly golden and set.** Keep an eye on ’em! Ovens vary, so check after 3 minutes. You want the whites to be lightly golden brown and set, but still soft.
- **Carefully place an egg yolk into the center of each egg white nest.** Gently slide a yolk into each indentation . Be careful not to break the yolk!
- **Return to the oven and bake for another 2-3 minutes, or until the yolks are cooked to your liking.** Again, watch ’em closely! I like my yolks runny, so I only bake them for about 2 minutes. But if you like ’em more set, bake for a little longer.
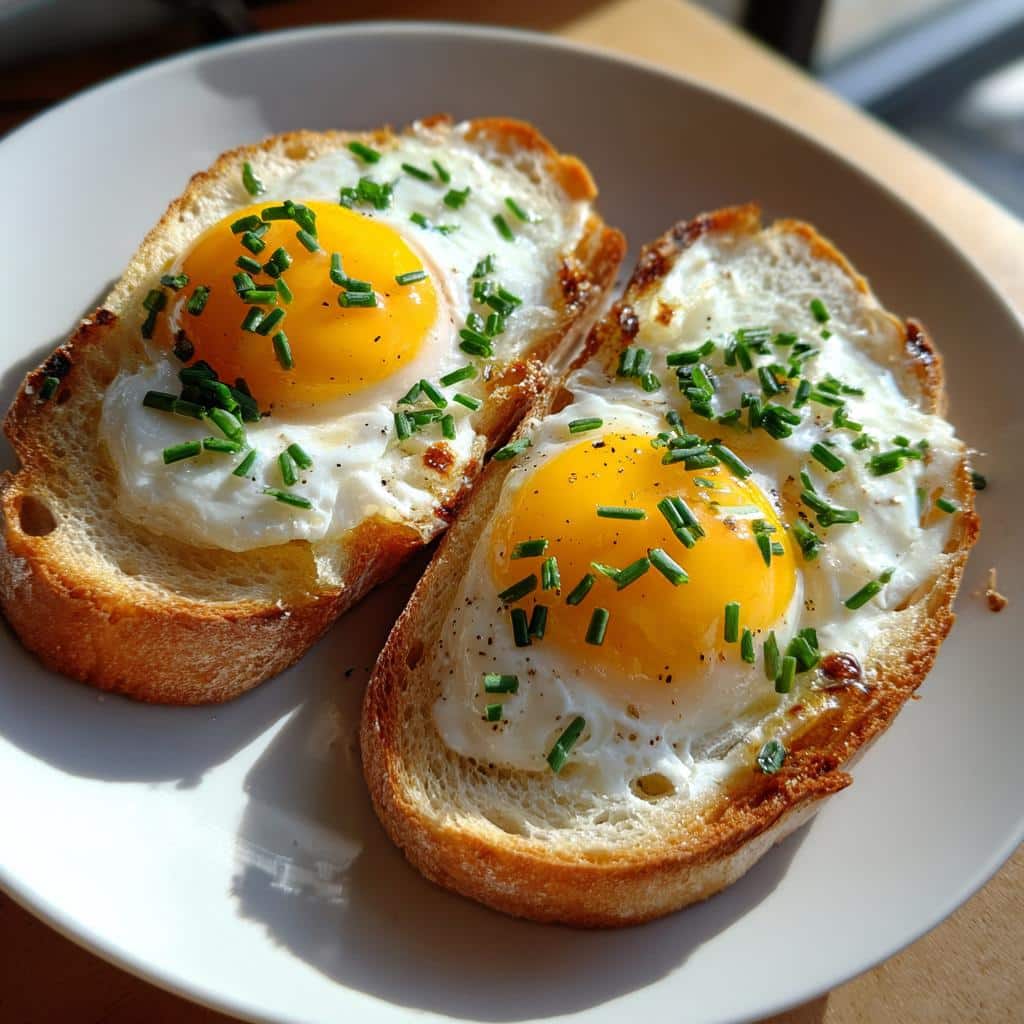
- **Remove from the oven and garnish with fresh herbs or red pepper flakes, if desired.** Now they are ready to be garnished. Fresh herbs just give them an extra pop, you know?
- **Serve immediately on toast.**. Get that toast ready so those cloud eggs can be placed right on top! Enjoy right after you make them for the best taste.

Tips for Making the Best Cloud Eggs (Cloud Toast)
Want to take your cloud eggs from “meh” to “OMG!”? Here are a few tricks I’ve learned along the way.
- **Whipping those whites:** Make SURE your bowl and beaters are squeaky clean! Not even a *tiny* bit of grease! Otherwise, your whites won’t whip properly.
- **Cheese, please!** Stronger cheeses like Gruyère or Parmesan really pack a flavor punch. But honestly, use whatever shredded deliciousness you have on hand!
- **Baking time is key:** Keep a close eye on those clouds. Every oven’s different, so start checking early. Remember, you want them golden, not burnt!
- **Yolk perfection:** Runny yolk is my jam. But hey, you do you! Bake them longer if you prefer a firmer yolk. That’s the best part about making it at home: you have the control!
Variations on the Classic Cloud Eggs (Cloud Toast) Recipe
Okay, so you’ve nailed the basic cloud egg. Awesome! Now, let’s get a little crazy (in a good way, of course!). This recipe is practically begging for you to experiment. Here’s a few ideas to get your creative juices flowing:
- **Cheesy dreams:** Forget Gruyère! Try a sharp cheddar for a bolder flavor, or mozzarella for a creamy, almost pizza-like vibe.
- **Herb it up!** Thyme and rosemary bring a totally different flavor profile to the party. Just sprinkle ’em in with the cheese before you bake the whites.
- **Spice it nice:** A pinch of garlic powder or smoked paprika? Yes, please! Adds a nice little warmth to things.
- **Topping time!**: Crispy bacon bits? Sautéed veggies? YES! I love adding a few chopped veggies right before I put the yolk on. Asparagus in the spring? Oh man, it’s SO good.
Serving Suggestions for Your Delicious Cloud Eggs (Cloud Toast)
Alright, you’ve got these beautiful cloud eggs… now what? Don’t just eat ’em straight from the pan (okay, maybe you can sneak one bite!). Here are a few things I love serving alongside my cloud creations.
- Avocado slices: Creamy, healthy, and tastes great. What more could you ask for?
- Fresh fruit: Berries, melon, sliced peaches… anything sweet and juicy contrasts perfectly with the savory eggs.
- A side salad: Keep it light and simple. A few greens with a vinaigrette is all you need.
- Coffee, of course! Cloud eggs and coffee? It’s the perfect cozy breakfast combo.

Frequently Asked Questions About Cloud Eggs (Cloud Toast)
Can I make Cloud eggs (Cloud toast) ahead of time?
Sadly, no, Cloud eggs are really best enjoyed *immediately*. Once they cool, the whites deflate and lose their fluffiness. But hey, they’re so quick to make, it’s not really a big deal, is it?
What kind of cheese works best for Cloud eggs (Cloud toast)?
Honestly, anything that melts! I love Gruyère ’cause it’s got that fancy pants flavor, but Parmesan adds a nice salty bite. Cheddar? Mozzarella? Go for it! Just avoid pre-shredded cheese, as I find it doesn’t melt as well. Plus, they add that extra touch we all want for the best looking cloud eggs (cloud toast) we can make!
How do I prevent my Cloud eggs (Cloud toast) from deflating?
The key is to not overbake them! You want the whites to be set, but still soft. Overbaking makes them dry and prone to deflating. Also, gently fold in the cheese – don’t beat the heck out of it! Treat those whites with love! You’ll have a plate full of pinterest trending Cloud eggs (Cloud toast) in no time.
My egg whites aren’t whipping into stiff peaks! What am I doing wrong?
A few things could be happening! Make sure your bowl and beaters are squeaky clean and completely dry. Even a tiny bit of grease can sabotage your whites. Also, be patient! It can take a few minutes for those peaks to form. And make sure NO yolk got mixed in!!!
Disclaimer About Cloud Eggs (Cloud Toast) Nutritional Information
Heads up! Nutritional info? It’s just an estimate, okay? Depends on the exact ingredients/brands you use. So, not a super precise count!
Enjoy Your Homemade Cloud Eggs (Cloud Toast)!
Okay, that’s it! You’re officially a Cloud Eggs (Cloud Toast) master! Now go forth and enjoy your fluffy creations! Seriously, leave a comment below and let me know what you think! What are your favorite toppings? Any awesome variations I NEED to try? Also, snap a pic and share it on Insta – tag me so I can see your culinary masterpieces! I can’t wait to hear from you!
Print
Cloud Eggs (Cloud Toast)
- Total Time: 13 min
- Yield: 2 servings 1x
- Diet: Vegetarian
Description
Make fluffy cloud eggs for a fun and comforting breakfast or brunch.
Ingredients
- 2 large eggs
- Salt and pepper to taste
- 1/4 cup shredded cheese (such as Gruyère or Parmesan)
- Optional toppings: chives, herbs, red pepper flakes
- Toast for serving
Instructions
- Preheat your oven to 400°F (200°C).
- Separate the egg whites from the yolks, placing the whites in a clean, dry bowl and the yolks in a separate small bowl.
- Whip the egg whites with a mixer until stiff peaks form.
- Gently fold in the cheese and any desired seasonings.
- Spoon the egg white mixture onto a baking sheet lined with parchment paper, making two nests.
- Make a small indentation in the center of each nest.
- Bake for 3-5 minutes, or until the egg whites are lightly golden and set.
- Carefully place an egg yolk into the center of each egg white nest.
- Return to the oven and bake for another 2-3 minutes, or until the yolks are cooked to your liking.
- Remove from the oven and garnish with fresh herbs or red pepper flakes, if desired.
- Serve immediately on toast.
Notes
- For a richer flavor, use high-quality cheese.
- You can add cooked bacon or ham to the egg white mixture.
- Keep an eye on the eggs while baking, as cooking times may vary.
- Prep Time: 5 min
- Cook Time: 8 min
- Category: Breakfast
- Method: Baking
- Cuisine: American
Nutrition
- Serving Size: 1 serving
- Calories: 250
- Sugar: 1
- Sodium: 200
- Fat: 18
- Saturated Fat: 8
- Unsaturated Fat: 10
- Trans Fat: 0
- Carbohydrates: 5
- Fiber: 0
- Protein: 15
- Cholesterol: 210