 Skip to content

Oh, hello there! Lisa Raymond here, and I’m practically bouncing with excitement to share my latest kitchen obsession with you. You know how much I love unfussy, soulful recipes, right? Well, let me tell you about the magical moment I first bit into a Biscoff cookie – it was like a warm hug from a gingerbread man, but even better! Ever since then, I’ve been on a mission to find the easiest, most delicious ways to incorporate that unique, caramelly, spiced goodness into everything. And friends, I’ve done it. If you’re looking for show-stopping Biscoff desserts that are surprisingly simple to whip up, you’ve hit the jackpot. This no-bake cheesecake brings all that cozy flavor without ever turning on the oven. Trust me, if I can make it look and taste this good on a Tuesday afternoon, you totally can too!
Why You’ll Love This No-Bake Biscoff Dessert
Honestly, what’s not to love about a dessert that tastes this incredible but asks so little of you? This Biscoff cheesecake isn’t just delicious; it’s a dream come true for anyone who wants maximum flavor with minimal fuss. Here’s why it’s about to become your new go-to:
- Totally No-Bake: Yep, you heard that right! No oven needed, which means less heat in your kitchen and less stress for you. Perfect for those hot summer days or when you just don’t feel like wrestling with your oven.
- Big Biscoff Flavor: Every single bite is packed with that unmistakable, warm, spiced Biscoff goodness. From the crust to the creamy filling and even the topping, it’s a Biscoff lover’s paradise.
- Seriously Quick Prep: We’re talking active prep time of maybe 30 minutes. Most of the work is just chilling, so you can do other things (like planning your next bite!).
- Impressive but Easy: It looks fancy, but it’s deceptively simple to make. Your guests will think you spent hours, but it’ll be our little secret.
- Perfect for Any Occasion: It’s a crowd-pleaser for potlucks, a special treat for family dinner, or just a little something “extra” to brighten your week.
Essential Ingredients for Biscoff Desserts
Alright, let’s talk ingredients! You know, baking is like a little science experiment, and having the right stuff makes all the difference. For this amazing no-bake Biscoff dessert, we’re going to break it down. I’ve laid out everything you need, clearly, so you’re not guessing in the middle of a recipe. Getting your ingredients ready beforehand (what we call “mise en place” in fancy chef terms, but I just call it “getting my ducks in a row”) makes everything so much smoother!
- For the Crust:
- 200g (that’s about 1.5 cups) Biscoff cookies, fully crushed – I just throw mine in a food processor, super easy!
- 75g (which is around 5 tablespoons) unsalted butter, melted down.
- For the Creamy Filling:
- 500g (that’s two blocks) cream cheese, softened to room temperature – this is SO important for a smooth filling!
- 100g (about 0.5 cup) granulated sugar.
- 1 teaspoon vanilla extract – real vanilla makes a difference, trust me.
- 250ml (that’s 1 cup) heavy cream, chilled.
- 150g (roughly 0.5 cup) Biscoff spread, melted until it’s nice and pourable.
- For the Drizzle and Topping:
- 50g (about 0.25 cup) Biscoff spread, melted again, for that gorgeous drizzle.
- 2-3 whole Biscoff cookies, crushed or broken up for that final, pretty sprinkle.
Equipment Needed for Perfect Biscoff Desserts
Okay, so we’ve got the delicious ingredients, now let’s gather our tools! You don’t need anything super fancy for this no-bake Biscoff dessert, just a few kitchen essentials. This is part of what makes it so wonderfully unfussy, exactly how I like my recipes:
- A good quality food processor for crushing those Biscoff cookies quickly. If you don’t have one, a Ziploc bag and a rolling pin work just fine!
- An 8-inch (20 cm) springform pan – this is key for getting those beautiful, clean slices.
- A couple of mixing bowls – one large for the cream cheese mixture, another for whipping cream.
- An electric mixer (handheld or stand mixer) makes light work of whipping cream cheese and heavy cream. A whisk works too, but your arm might get a workout!
- A rubber spatula or spoon for folding.
- Measuring cups and spoons – essential for accuracy!
- A small microwave-safe bowl or saucepan to melt that Biscoff spread.
How to Prepare Your No-Bake Biscoff Desserts
Alright, friend, this is where the magic happens! Don’t you just love how simple no-bake recipes are? It’s all about method here, and I promise, we’ll sail through this. We’re going to build this incredible Biscoff dessert layer by delicious layer. Follow these steps, and you’ll have a showstopper chilling in no time!
- Crush Those Cookies & Make the Crust: First things first, grab those lovely Biscoff cookies. Toss them into your food processor and blitz until they’re fine crumbs. If you don’t have a food processor, no worries! Just pop them in a sturdy Ziploc bag and get out any kitchen frustrations with a rolling pin – it works surprisingly well! Now, melt your butter (a quick zap in the microwave usually does the trick). Pour the melted butter over the Biscoff crumbs and mix them together until everything is evenly moistened – it should feel like wet sand. Press this mixture firmly into the bottom of your 8-inch springform pan. Use the bottom of a glass or your knuckles to get it nice and compact. Pop that crust into the fridge for at least 30 minutes. This little chill time is crucial to help it set up beautifully.
- Whip Up the Cream Cheese Base: While your crust is chilling, get started on the glorious filling! In your large mixing bowl, beat the softened cream cheese with the granulated sugar and vanilla extract. You want this super smooth, no lumps allowed! Spend a good 2-3 minutes beating it until it’s light and airy.
- Fold in the Cream & Biscoff Spread: In a separate, chilled bowl, whip your heavy cream until it forms stiff peaks. You know, when you lift the beaters and the cream holds its shape? Gently fold this whipped cream into your cream cheese mixture. Now, here’s a tip: melt your 150g of Biscoff spread until it’s pourable, then gently fold that into the cream cheese and whipped cream mixture. Don’t overmix it; just combine until you see no more streaks. Overmixing can make it lose its airy texture.
- Assemble & Chill Out: Pour your luscious Biscoff filling over your chilled Biscoff crust in the springform pan. Use your spatula to smooth out the top. Now for the hard part (just kidding, it’s easy-peasy!): pop the whole thing back into the fridge. It needs a good 4-6 hours to set, but honestly, overnight is even better. The longer it chills, the firmer and more sliceable it will be. I often make mine the night before a gathering, just like I do with my Oreo Dump Cake for easy entertaining!
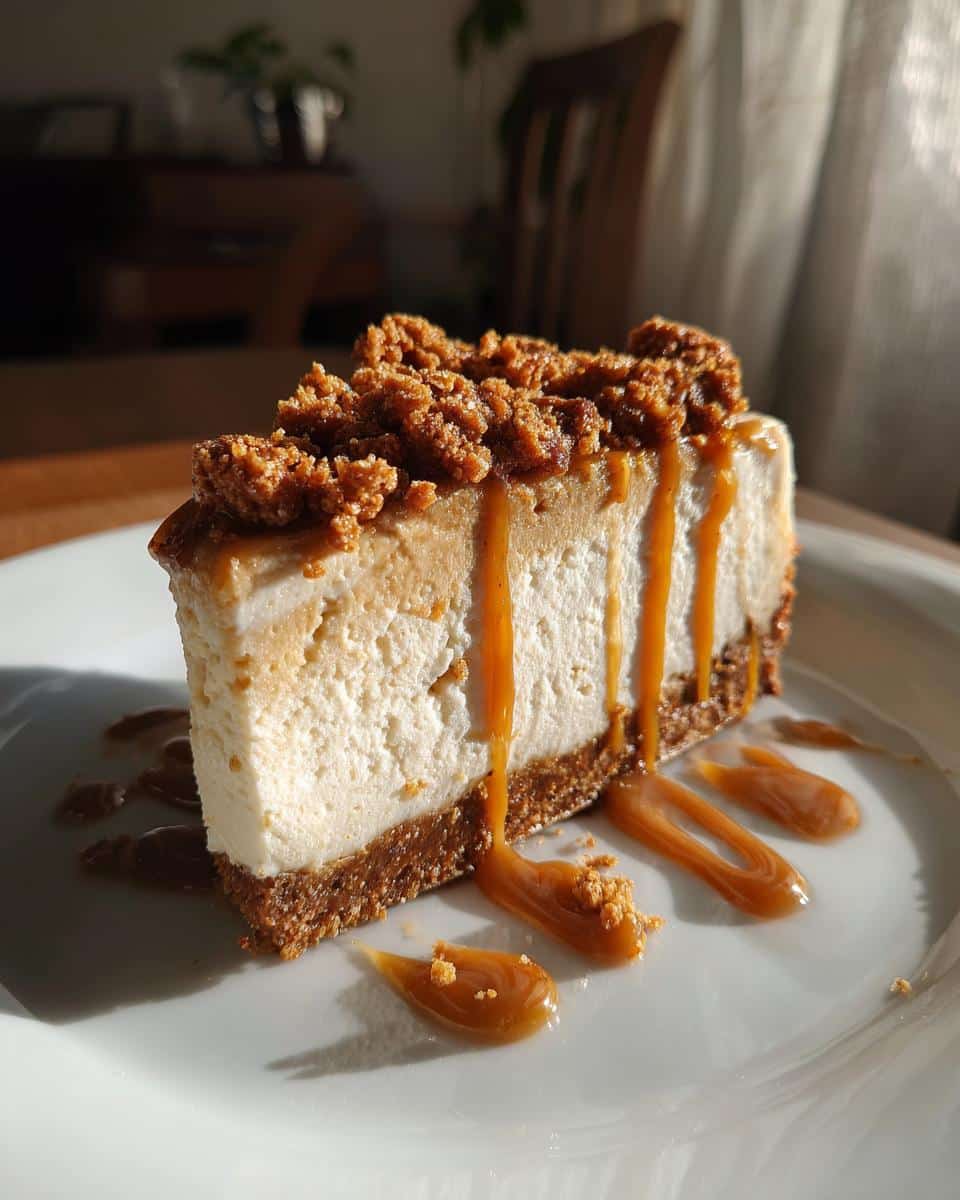
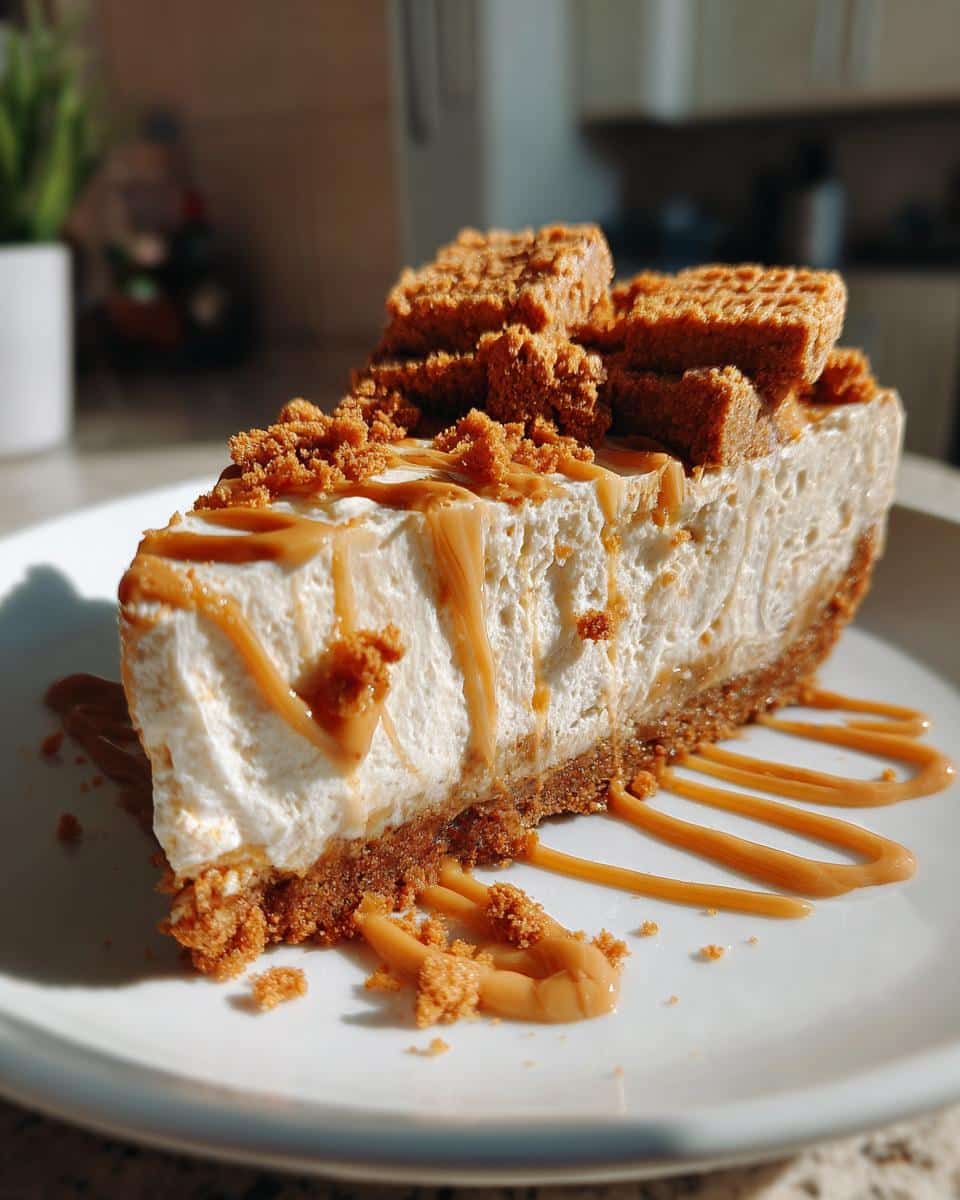
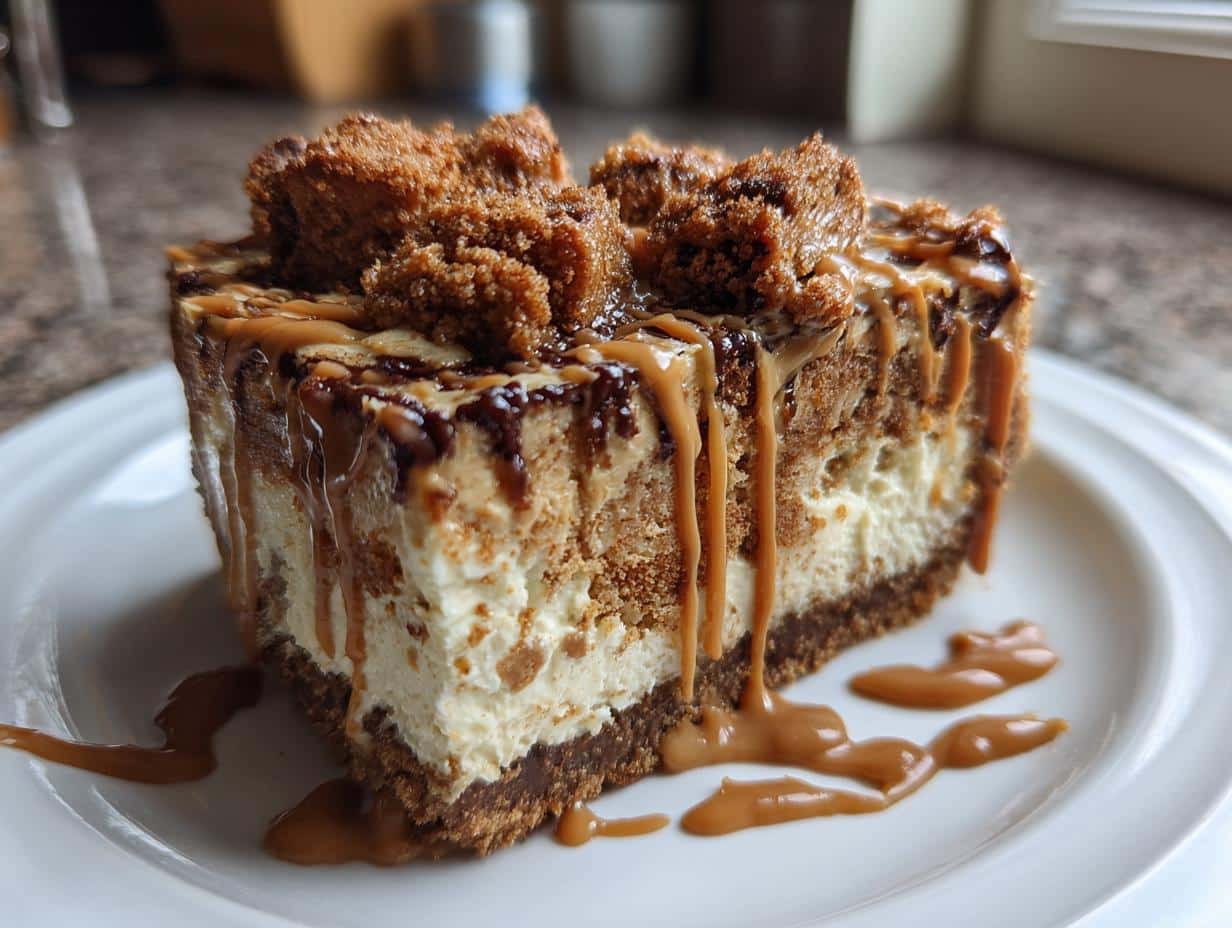
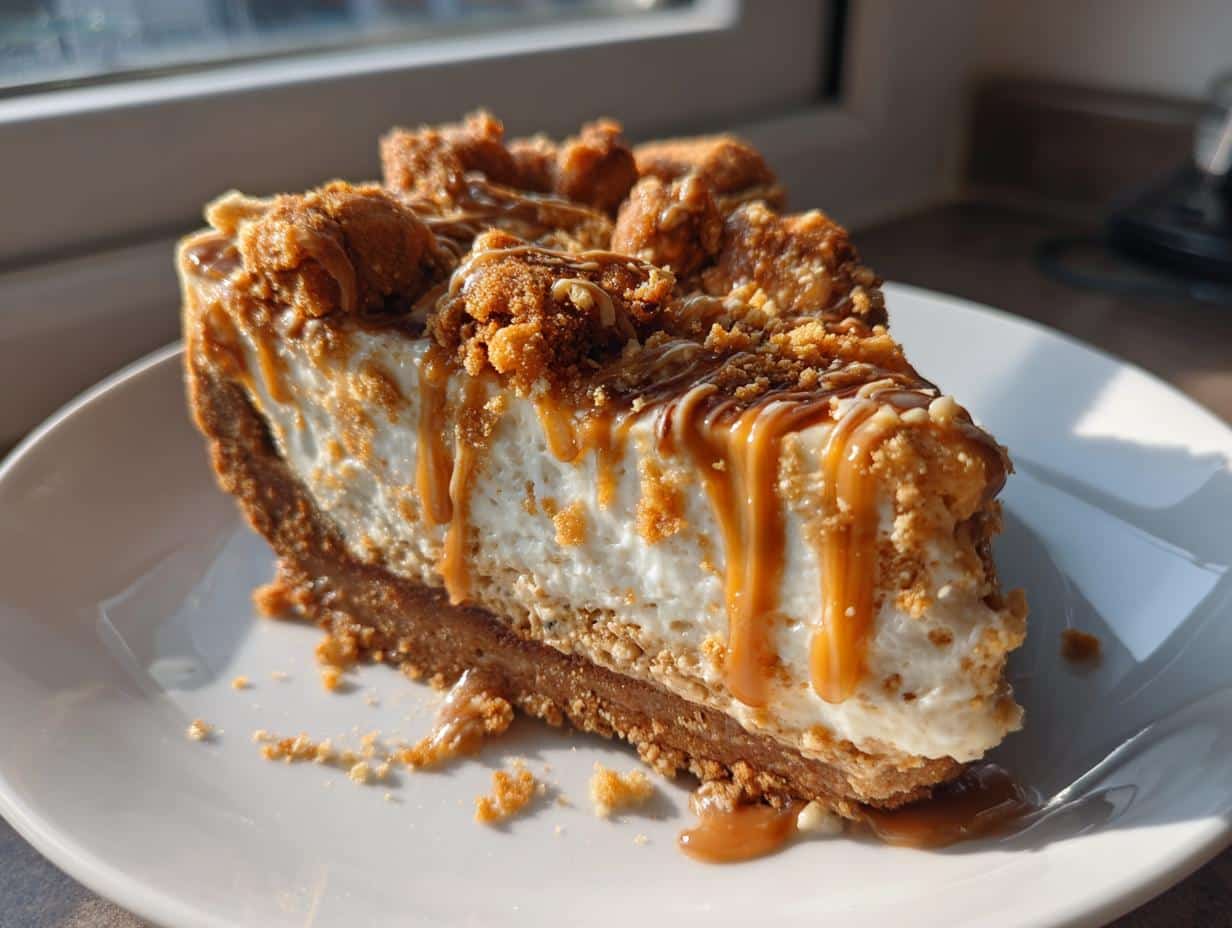
- Drizzle & Decorate: Once your cheesecake is perfectly set, warm up that remaining 50g of Biscoff spread until it’s lovely and drippy. Drizzle it artfully (or wildly, no judgment here!) over the top of your cheesecake. Finally, sprinkle on those crushed or broken Biscoff cookies for that extra crunch and visual appeal. Carefully remove the springform ring, slice, and prepare for applause!
Tips for Success with Biscoff Desserts
Okay, so you’ve got the steps down, but let me share a few of my personal secrets and hard-won tips that’ll take your Biscoff dessert from good to absolutely phenomenal. These little details really do make all the difference, trust me!
- Room Temperature Cream Cheese is a MUST: Seriously, don’t rush this! If your cream cheese isn’t soft enough, you’ll end up with lumps in your filling, and nobody wants lumpy cheesecake. Take it out of the fridge a couple of hours beforehand. This is probably the most important tip I can give you for any cheesecake recipe.
- Don’t Be Afraid to Melt the Biscoff Spread: For blending it into the filling and especially for that gorgeous drizzle on top, a slightly melted, pourable Biscoff spread is key. A quick zap in the microwave (about 15-30 seconds) is all you need. It makes it so much easier to incorporate smoothly and drizzle elegantly.
- Chill, Chill, Chill: I know, waiting is the hardest part! But a properly chilled cheesecake is a firm, sliceable, and utterly delicious cheesecake. Those 4-6 hours are the minimum, but if you can manage to let it sit overnight, you’ll be rewarded with the best possible texture and set. Patience truly is a virtue here!
- Don’t Overmix Once the Whipped Cream is In: Once you’ve folded in that glorious whipped cream, stop mixing as soon as it’s just combined. Overmixing can knock all that lovely air out, making your filling less light and airy. We want it creamy but still with a nice fluff!
Common Questions About Biscoff Desserts
Okay, so you’ve got the basics down, but I bet a few questions are swirling around in your head! That’s totally normal. After years in the kitchen, I’ve heard it all, so let’s tackle some common thoughts you might have about making this incredible no-bake Biscoff dessert. These little insights can really help you feel confident in the kitchen, whether you’re making cottage cheese ice cream or a complex cake!
Can I make this Biscoff dessert ahead of time?
Absolutely, 100%! In fact, I highly recommend it. This no-bake Biscoff cheesecake actually tastes even better and sets up more perfectly if you make it the day before you plan to serve it. Just let it chill in the fridge overnight, covered, and you’ll wake up to a dessert that’s ready to impress. It’s a fantastic make-ahead option for parties!
What are some variations for this Biscoff cheesecake?
Oh, the possibilities are endless for customizing your Biscoff creation! If you want to play around, you could try adding a layer of thinly sliced bananas on top of the crust before adding the filling for a Biscoff banana cream vibe. A sprinkle of mini chocolate chips in the filling, or even a swirl of melted white chocolate on top of the Biscoff drizzle, would be delicious too! You could also gently fold in some toasted chopped pecans for extra crunch and nuttiness.
How long do Biscoff desserts last?
This Biscoff dessert, especially the cheesecake, will last beautifully in the refrigerator for about 3-4 days. Just make sure it’s covered tightly with plastic wrap or stored in an airtight container to keep it fresh and prevent it from absorbing any fridge odors. It usually doesn’t last that long in my house, though, because it gets eaten so fast!
Nutritional Information for Your Biscoff Desserts
Just a quick heads-up on the nutritional stuff for this yummy Biscoff dessert! The exact numbers can really swing depending on the specific brands you use for your Biscoff cookies, cream cheese, and even the type of sugar. So, think of any nutritional values you might see elsewhere as estimates rather than hard facts. What I can tell you for sure is that it’s packed with deliciousness!
Share Your Favorite Biscoff Desserts
So, there you have it, my friends! I really hope you give this no-bake Biscoff dessert a try. But more than that, I want to hear from you! Have you made it? Did you add your own special twist? What are your go-to Biscoff dessert ideas? I absolutely love hearing about your kitchen adventures, so drop a comment below and let’s chat about all things Biscoff. Happy baking (or in this case, happy chilling)!
Print
No-Bake Biscoff Cheesecake
- Total Time: 4 hours 30 min
- Yield: 8-10 servings 1x
- Diet: Vegetarian
Description
This recipe provides instructions for a no-bake Biscoff cheesecake. It features a Biscoff cookie crust and a creamy filling infused with Biscoff spread. An optional Biscoff drizzle and cookie crumble topping are included.
Ingredients
- 200g (1.5 cups) Biscoff cookies, crushed
- 75g (5 tablespoons) unsalted butter, melted
- 500g (2 blocks) cream cheese, softened
- 100g (0.5 cup) granulated sugar
- 1 teaspoon vanilla extract
- 250ml (1 cup) heavy cream
- 150g (0.5 cup) Biscoff spread, melted (for filling)
- 50g (0.25 cup) Biscoff spread, melted (for topping)
- 2–3 whole Biscoff cookies, crushed or broken (for topping)
Instructions
- Combine crushed Biscoff cookies and melted butter in a medium bowl. Press the mixture into the bottom of a 20cm (8-inch) springform pan. Chill for 30 minutes.
- Beat softened cream cheese, granulated sugar, and vanilla extract in a large bowl until smooth.
- Whip heavy cream in a separate bowl until stiff peaks form.
- Gently fold the whipped cream into the cream cheese mixture.
- Fold in the melted Biscoff spread until just combined.
- Pour the filling over the chilled crust in the springform pan. Smooth the top.
- Refrigerate the cheesecake for 4-6 hours, or overnight, until set.
- Warm the remaining Biscoff spread until pourable. Drizzle it over the cheesecake. Sprinkle with crushed or broken Biscoff cookies.
- Remove the cheesecake from the pan and serve chilled.
Notes
- Ensure the cream cheese is at room temperature for a smooth filling.
- Do not overmix the filling once the whipped cream and Biscoff spread are added.
- For best results, chill the cheesecake overnight to ensure it sets completely.
- Prep Time: 30 min
- Cook Time: 0 min
- Category: Dessert
- Method: No-Bake
- Cuisine: European
Nutrition
- Serving Size: 1 slice
- Calories: 450
- Sugar: 35g
- Sodium: 250mg
- Fat: 30g
- Saturated Fat: 18g
- Unsaturated Fat: 10g
- Trans Fat: 0.5g
- Carbohydrates: 40g
- Fiber: 1g
- Protein: 5g
- Cholesterol: 90mg