
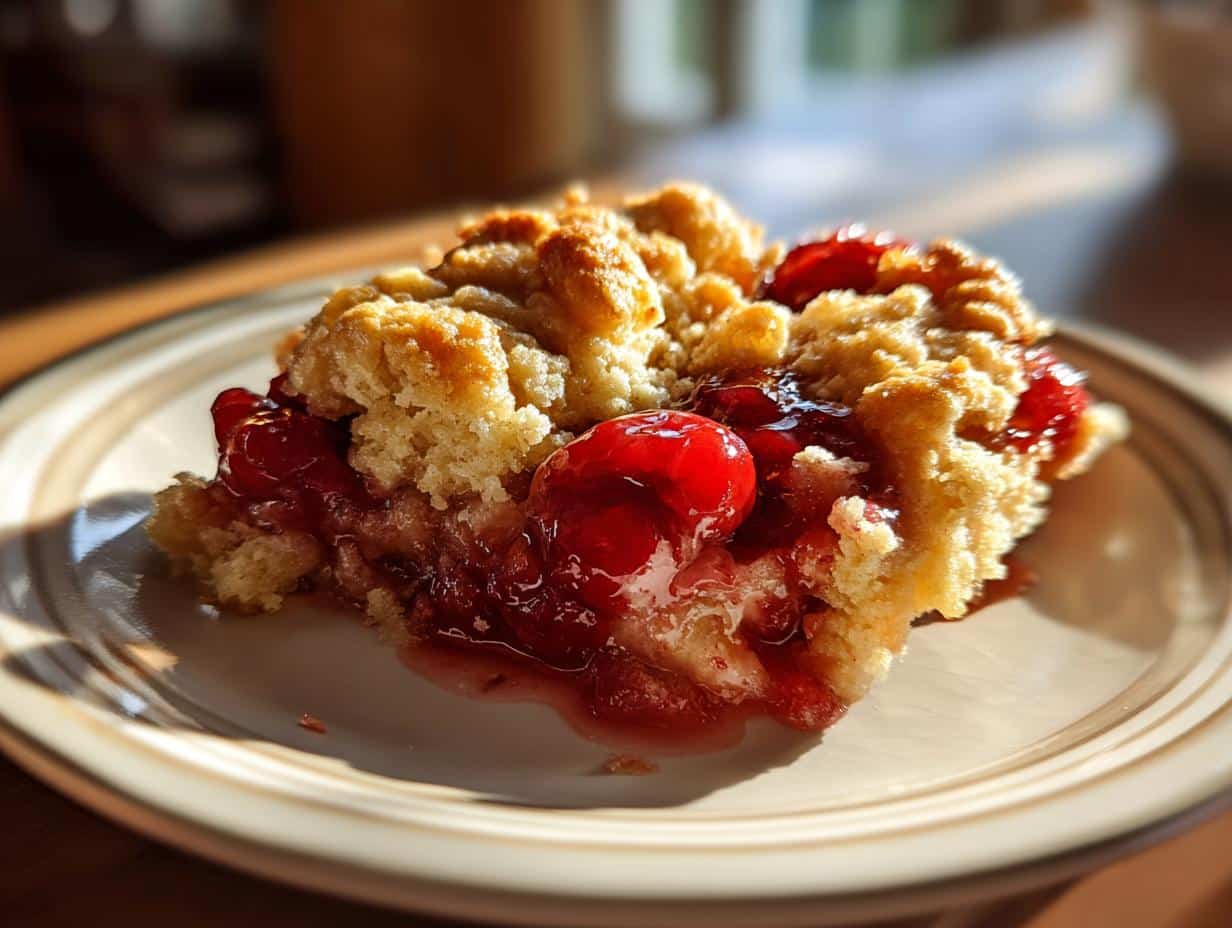
Okay, y’all, let me tell you a story. I was maybe knee-high to a grasshopper, perched on a stool in my Grandma’s kitchen, watching her make what I now know is the *best* Old-Fashioned Cherry Cobbler this side of the Mississippi. The smell of sweet cherries and warm biscuits filled the air…pure magic, I tell you! It’s one of those memories that just sticks with you, you know?
Grandma’s cobblers were legendary. A real taste of Southern comfort food, simple and honest. And now, after years of tweaking and perfecting (and maybe a few kitchen mishaps – oops!), I’m so excited to share my version of her Old-Fashioned Cherry Cobbler recipe with you. I’m Maxine, by the way! I run a little supper club here in Asheville, and I’m all about sharing recipes that bring a little bit of joy to your kitchen. Trust me, this one will!
Table of Contents
Why You’ll Love This Old-Fashioned Cherry Cobbler
Seriously, y’all are gonna flip for this cobbler! It’s just got *everything* going for it. Here’s why:
Quick and Easy Old-Fashioned Cherry Cobbler
Don’t have all day? No problem! This comes together faster than you can say “cherry pie.”
Bursting with Cherry Flavor in this Old-Fashioned Cherry Cobbler
We’re talkin’ serious cherry goodness! Sweet, tart, juicy…it’s a cherry explosion in every bite!
Comforting and Nostalgic Old-Fashioned Cherry Cobbler
This tastes like home, like Grandma’s kitchen, like pure, unadulterated happiness. It’s a hug in a bowl, I swear!
Perfect for Summer with this Old-Fashioned Cherry Cobbler
Cherries are in season, the sun is shining… What could be better than a warm slice of this cobbler? It’s the taste of summer, plain and simple.
Ingredients for Your Old-Fashioned Cherry Cobbler
Alright, let’s gather our goodies! Here’s what you’ll need to whip up this amazing Old-Fashioned Cherry Cobbler. Don’t worry, it’s mostly stuff you probably already have!
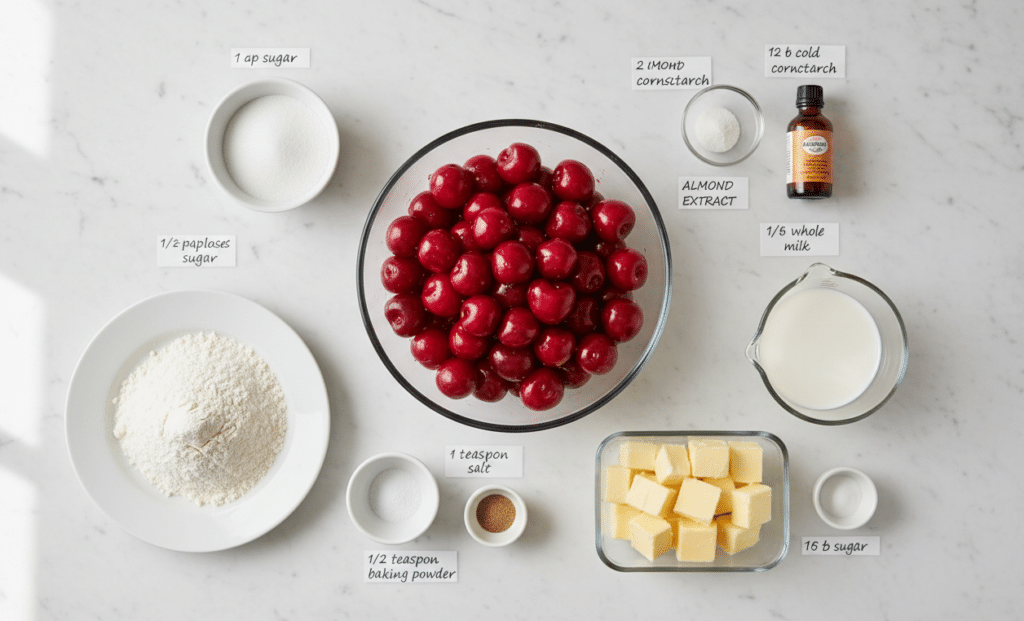
Cherry Filling Ingredients
6 cups fresh or frozen pitted cherries
Yep, you can use either! If they’re frozen, let ’em thaw a bit first. And make *sure* they’re pitted – nobody wants a surprise crunch!
1 cup granulated sugar
Just plain ol’ white sugar here, folks.
2 tablespoons cornstarch
This is our secret weapon for thickening up that cherry juice into a glorious, gooey sauce. Don’t skip it!
1/4 teaspoon almond extract
Oh, this adds such a subtle, lovely flavor! It just *boosts* the cherry taste, trust me.
Biscuit Topping Ingredients
1 cup all-purpose flour
The base of our lovely biscuit topping. I usually use unbleached, but whatever you’ve got is fine!
1 teaspoon baking powder
This is what makes our biscuits light and fluffy. Make sure it’s not expired!
1/2 teaspoon salt
A pinch of salt balances out the sweetness and brings out all the other flavors. Don’t forget it!
1/2 cup (1 stick) cold unsalted butter, cut into cubes
COLD, y’all! This is important. Cold butter creates flaky biscuits. Cut it into cubes so it’s easier to work with.
1/2 cup milk
Whole milk is my go-to, but you can use whatever kind you’ve got on hand.
2 tablespoons granulated sugar, for sprinkling
This gives our biscuit topping a little sparkle and a touch of extra sweetness. Plus, it looks pretty!
How to Make Old-Fashioned Cherry Cobbler: Step-by-Step Instructions
Okay, darlings, let’s get down to business! This Old-Fashioned Cherry Cobbler is easier than you think. Just follow these simple steps, and you’ll have a bubbling, delicious dessert in no time. Don’t worry, I’ll walk you through it!
Preparing the Cherry Filling
Combine cherries, sugar, cornstarch, and almond extract
Grab a large bowl – the biggest one you’ve got! Gently toss the cherries, sugar, cornstarch, and almond extract together. Make sure everything’s nicely coated. You don’t want any clumps of cornstarch lurking!
Pour into baking dish
Now, pour that gorgeous cherry mixture into a 9×13 inch baking dish. If you don’t have that exact size, don’t sweat it! Just use something similar. And hey, make sure your oven is preheating to 375°F (190°C). We want it nice and hot!
Making the Biscuit Topping
Whisk together dry ingredients
In a separate bowl (yes, another one!), whisk together the flour, baking powder, and salt. Whisking is key here – it helps distribute the baking powder evenly, so you don’t get any weird, salty pockets. Plus, it adds air, which makes for a lighter biscuit.
Cut in butter
This is where things get a little fun! Add those cold butter cubes to the flour mixture. Now, you can use a pastry blender if you’re fancy, but honestly, your fingers work just as well (maybe even better!). Just squish and rub the butter into the flour until it looks like coarse crumbs. The smaller the butter pieces, the flakier your biscuits will be! Careful, though, don’t let that butter get too warm!
Stir in milk
Pour in the milk and stir *just* until everything comes together. This is super important: do NOT overmix! Overmixing develops the gluten in the flour, and you’ll end up with tough, chewy biscuits. We want them light and tender, so gently does it!
Assembling and Baking the Old-Fashioned Cherry Cobbler
Drop spoonfuls of dough
Now, grab a spoon and drop spoonfuls of that biscuit dough evenly over the cherry mixture. They don’t have to be perfect, y’all! Rustic is good! Just make sure you’ve got biscuit coverage across the whole dish.
Sprinkle with sugar
Sprinkle those two tablespoons of sugar over the top of the biscuit dough. This gives the topping a lovely sparkle and a little extra sweetness. Plus, it helps the biscuits brown up beautifully in the oven.
Bake until golden brown
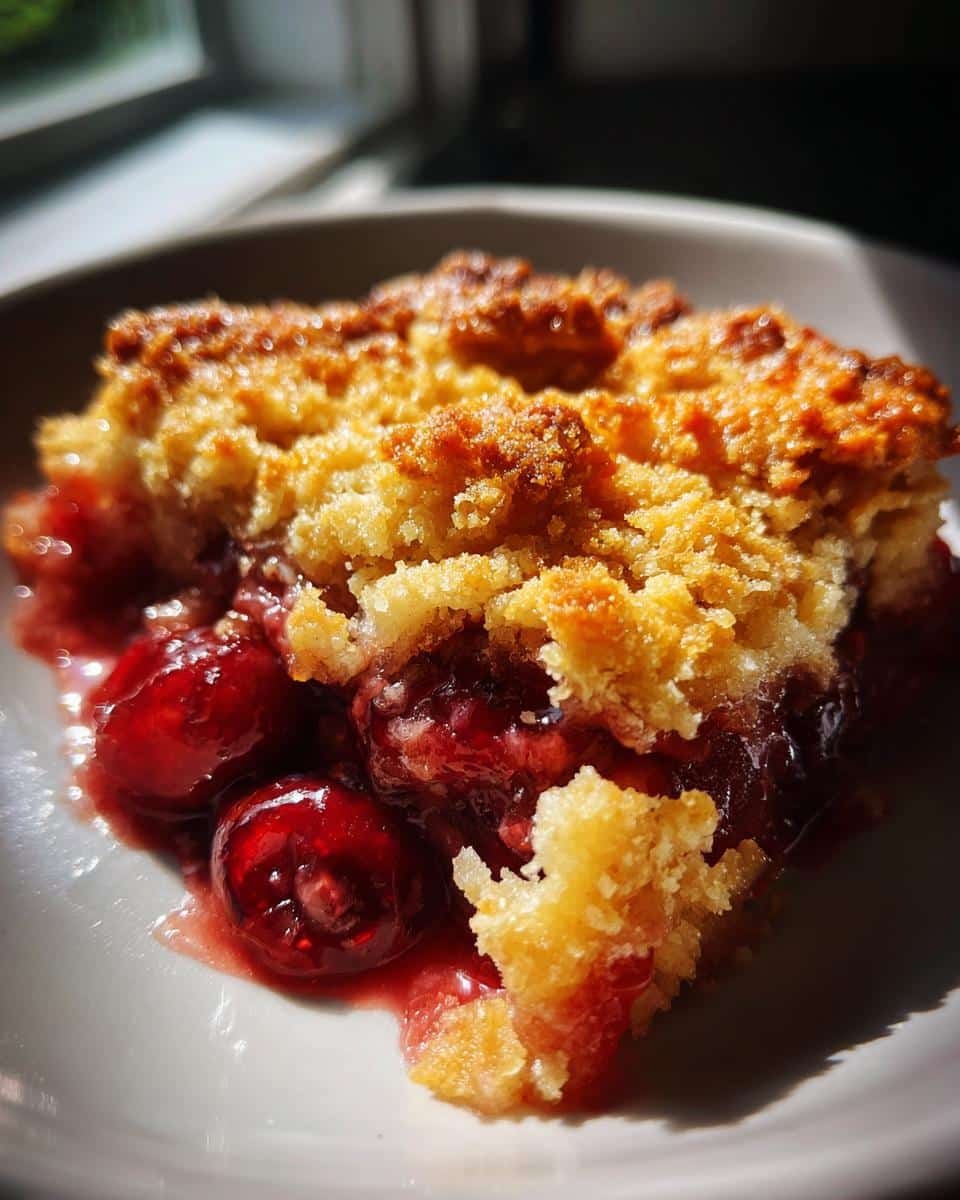
Pop that baby into the preheated oven and bake for 30-35 minutes, or until the topping is golden brown and the cherry filling is bubbling like crazy. The smell alone will drive you wild, I promise! Keep an eye on it, though – ovens can be fickle things. You’re looking for that golden-brown perfection!
Tips for the Best Old-Fashioned Cherry Cobbler
Want to take your Old-Fashioned Cherry Cobbler from good to *amazing*? Here are a few of my tried-and-true secrets!
Use High-Quality Cherries for your Old-Fashioned Cherry Cobbler
Seriously, this makes a difference! Fresh, ripe cherries will give you the best flavor, hands down. If you’re using frozen, make sure they’re a good brand and haven’t been freezer-burned. Happy cherries, happy cobbler!
Don’t Overmix the Biscuit Dough in your Old-Fashioned Cherry Cobbler
I can’t stress this enough! Overmixing equals tough biscuits, and nobody wants that. Mix until *just* combined, even if there are a few streaks of flour. Trust me on this one!
Adjust Sugar to Taste when making Old-Fashioned Cherry Cobbler
Cherries vary in sweetness, so taste your filling before you bake it. If it’s too tart, add a little more sugar. If it’s super sweet, you might want to hold back a bit. You’re the boss!
Serve Warm for your Old-Fashioned Cherry Cobbler
This is non-negotiable! Warm cobbler is a thing of beauty. And if you really want to take it over the top? Add a scoop of vanilla ice cream or a dollop of whipped cream. You deserve it!
Ingredient Notes and Substitutions for Old-Fashioned Cherry Cobbler
Okay, so maybe you’re missing an ingredient or two, or maybe you just wanna shake things up a bit? No worries! Here are a few swaps you can make in this Old-Fashioned Cherry Cobbler recipe:
Gluten-Free Old-Fashioned Cherry Cobbler
Got a gluten sensitivity? No problem! Just swap out the all-purpose flour for your favorite gluten-free blend. I’ve had great luck with Bob’s Red Mill, but experiment and see what you like!
Cherry Variations for your Old-Fashioned Cherry Cobbler
Don’t have regular cherries? Get creative! Rainier cherries would be gorgeous, or even a mix of sweet and tart cherries would be amazing. Just adjust the sugar to taste, depending on how sweet your cherries are.
Butter Substitutions in Old-Fashioned Cherry Cobbler
Out of butter? Gasp! Okay, it happens. You *can* use shortening or margarine in a pinch, but honestly, the butter gives the biscuits the best flavor and texture. If you do sub, make sure it’s cold, just like the butter!
Serving Suggestions for Your Old-Fashioned Cherry Cobbler
Alright, you’ve got this amazing Old-Fashioned Cherry Cobbler fresh from the oven…now what? Here are a few of my favorite ways to serve it up!
Vanilla Ice Cream
Classic for a reason! The cold, creamy vanilla is *perfection* with the warm, gooey cobbler. My favorite part is when the ice cream starts to melt a little…mmm!
Whipped Cream
Light and fluffy, whipped cream adds a touch of elegance to this rustic dessert. A little sprinkle of cinnamon on top? Yes, please!
A scoop of Greek yogurt
Want something a little lighter? A dollop of Greek yogurt adds a tangy twist that’s surprisingly delicious! It cuts through the sweetness perfectly.
Sprinkle of cinnamon
Speaking of cinnamon, a little sprinkle on top of *anything* you serve with this cobbler just adds a warm, cozy touch. Why not, right?
Storing Your Old-Fashioned Cherry Cobbler
So, you’ve made this glorious Old-Fashioned Cherry Cobbler…and maybe, *just* maybe, you have some leftovers? Here’s how to keep it fresh and delicious!
Refrigerating Leftover Old-Fashioned Cherry Cobbler
Let the cobbler cool completely, then cover it tightly with plastic wrap or foil (or transfer it to an airtight container). It’ll keep in the fridge for up to 3 days. Easy peasy!
Reheating Old-Fashioned Cherry Cobbler
My favorite way? Pop a slice in the microwave for about 30-60 seconds, until it’s warmed through. You can also reheat it in a preheated oven (350°F/175°C) for about 10-15 minutes. It’ll taste almost as good as the first day! Careful, it can get bubbly!
Freezing Old-Fashioned Cherry Cobbler
Yep, you can freeze it! Let it cool completely, then wrap it *really* well in plastic wrap and then foil. It’ll keep in the freezer for up to 2 months. When you’re ready to eat it, let it thaw overnight in the fridge and then reheat as directed above. It might lose *a little* of its original glory, but it’s still a pretty darn good treat to have on hand!
Nutritional Information for Old-Fashioned Cherry Cobbler
Alright, y’all, let’s talk numbers! Here’s a rough estimate of the nutritional info for one slice of this Old-Fashioned Cherry Cobbler. Keep in mind that these numbers can vary depending on the exact ingredients you use (especially the cherries and the type of milk!). So, take it with a grain of salt, okay?
Per serving (about 1/12 of the cobbler):
- Calories: ~250
- Fat: ~10g
- Saturated Fat: ~6g
- Unsaturated Fat: ~3g
- Trans Fat: 0g
- Cholesterol: ~30mg
- Sodium: ~150mg
- Carbohydrates: ~40g
- Fiber: ~2g
- Sugar: ~25g
- Protein: ~3g
Frequently Asked Questions About Old-Fashioned Cherry Cobbler
Got questions about making the perfect Old-Fashioned Cherry Cobbler? I’ve got answers! Here are a few of the most common things folks ask me:
Can I Use Frozen Cherries in This Old-Fashioned Cherry Cobbler Recipe?
Absolutely, darlin’! Frozen cherries work great. Just thaw them a bit and drain off any excess juice. They might release a little more liquid than fresh cherries, so you could add an extra teaspoon of cornstarch to your cherry filling mixture to make sure it’s nice and thick.
How Do I Prevent the Biscuit Topping from Getting Soggy in my Old-Fashioned Cherry Cobbler?
Ah, the dreaded soggy biscuit! A couple of tricks can help. First, don’t overmix the biscuit dough (as I mentioned before!). Second, make sure your oven is nice and hot before you pop the cobbler in. A good, hot oven helps the biscuits bake up quickly and prevents them from soaking up too much cherry juice. Also, try to leave a little space between each biscuit when you drop them on top of the cherries. This will allow the heat to circulate better.
Can I Make This Old-Fashioned Cherry Cobbler Ahead of Time?
You sure can! You can assemble the whole cobbler (cherry filling and biscuit topping) and keep it covered in the fridge for a few hours before baking. Just add a few extra minutes to the baking time to make sure the biscuits are cooked through. I don’t recommend making it *too* far in advance, though, because the biscuit topping can get a little gummy if it sits for too long.
What is the best way to pit cherries for Old-Fashioned Cherry Cobbler?
Pitting cherries can be a bit of a pain, I know! If you’re making a big batch of this Old-Fashioned Cherry Cobbler, a cherry pitter is a lifesaver. But if you don’t have one, no worries! A simple paperclip or a chopstick works just as well. Just poke it through the cherry where the stem was, and the pit should pop right out. Or use a paring knife to halve the cherry and remove the pit. Careful, though – cherry juice stains!
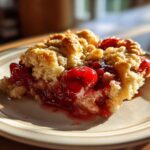
Grandma’s Foolproof Old-Fashioned Cherry Cobbler Recipe
- Total Time: 55 minutes
- Yield: 12 servings 1x
- Diet: Vegetarian
Description
This Old-Fashioned Cherry Cobbler recipe brings the taste of classic Southern comfort food to your kitchen. Enjoy a warm, homemade dessert with sweet cherries and a golden biscuit topping.
Ingredients
- 6 cups fresh or frozen pitted cherries
- 1 cup granulated sugar
- 2 tablespoons cornstarch
- 1/4 teaspoon almond extract
- 1 cup all-purpose flour
- 1 teaspoon baking powder
- 1/2 teaspoon salt
- 1/2 cup (1 stick) cold unsalted butter, cut into cubes
- 1/2 cup milk
- 2 tablespoons granulated sugar, for sprinkling
Instructions
- Preheat oven to 375°F (190°C).
- In a large bowl, combine cherries, 1 cup sugar, cornstarch, and almond extract. Mix well and pour into a 9×13 inch baking dish.
- In a separate bowl, whisk together flour, baking powder, and salt.
- Cut in cold butter using a pastry blender or your fingers until the mixture resembles coarse crumbs.
- Stir in milk until just combined. Do not overmix.
- Drop spoonfuls of biscuit dough evenly over the cherry mixture.
- Sprinkle the top with 2 tablespoons of sugar.
- Bake for 30-35 minutes, or until the topping is golden brown and the cherry filling is bubbly.
- Let cool slightly before serving.
Notes
- For a gluten-free version, use a gluten-free all-purpose flour blend.
- Adjust the amount of sugar based on the sweetness of your cherries.
- Serve warm with a scoop of vanilla ice cream or whipped cream.
- Prep Time: 20 minutes
- Cook Time: 35 minutes
- Category: Dessert
- Method: Baking
- Cuisine: Southern
Nutrition
- Serving Size: 1 slice
- Calories: 250
- Sugar: 25g
- Sodium: 150mg
- Fat: 10g
- Saturated Fat: 6g
- Unsaturated Fat: 3g
- Trans Fat: 0g
- Carbohydrates: 40g
- Fiber: 2g
- Protein: 3g
- Cholesterol: 30mg